
Enabling Conversion Tracking in WS Form
- Edit your respective form in WS Form
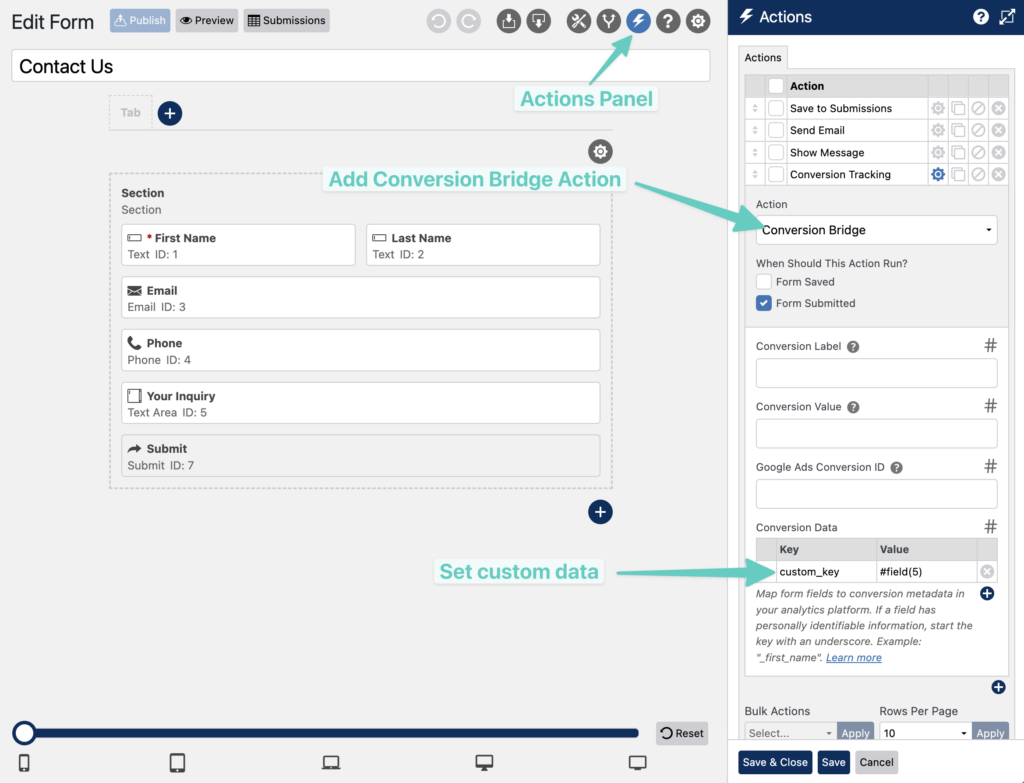
- Click on the lightning bolt icon to get to the Actions panel
- Add a new "Conversion Bridge" action (not Conversion Tracking)
- (Optionally) Enter a custom label and value
Sending Custom Form Data in WS Form
The Conversion Bridge integration with WS Form allows you to select specific form fields to be passed to your analytics or ad platform. Using the existing WS Form variables system, you can easily configure specific custom fields to be sent.
- In the Conversion Data field, enter Key/Value pairs
- You can select the # link to see the available variables which will be replaced by the values provided by the user when the form is submitted
Sending Enhanced Conversion Data in WS Form
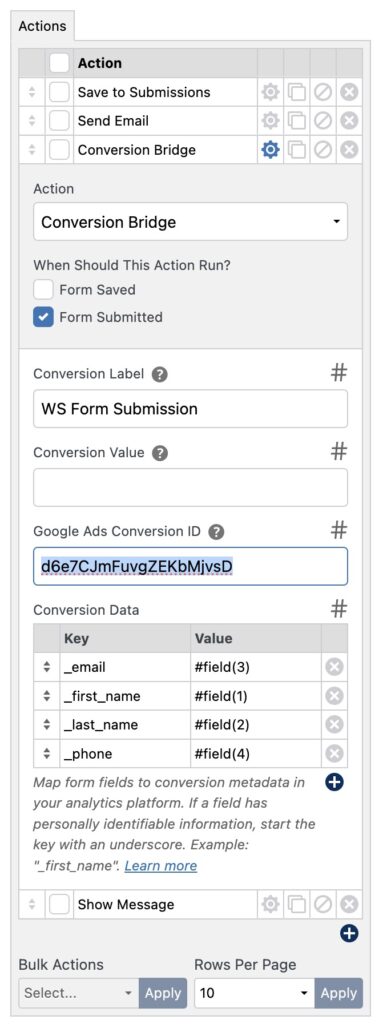
The Conversion Bridge integration with WS Form allows you to select specific form fields to be passed to your enabled ad platforms securely as enhanced conversion data. Adding values to be used for enhanced conversion data works exactly the same as custom form data described above, except you need to use specific Key values. Learn more about sending custom form data and personally identifiable information.
Note: Personally identifiable information must prefix the "Key" with an underscore. For example, use "_email", "_first_name", or "_last_name". This tells Conversion Bridge this information to be treated as sensitive personal information. You are responsible for ensuring you properly indicate personally identifiable information and not doing so could violate the Terms of Use of your analytics platform.
Including Conversion Journey in Emails
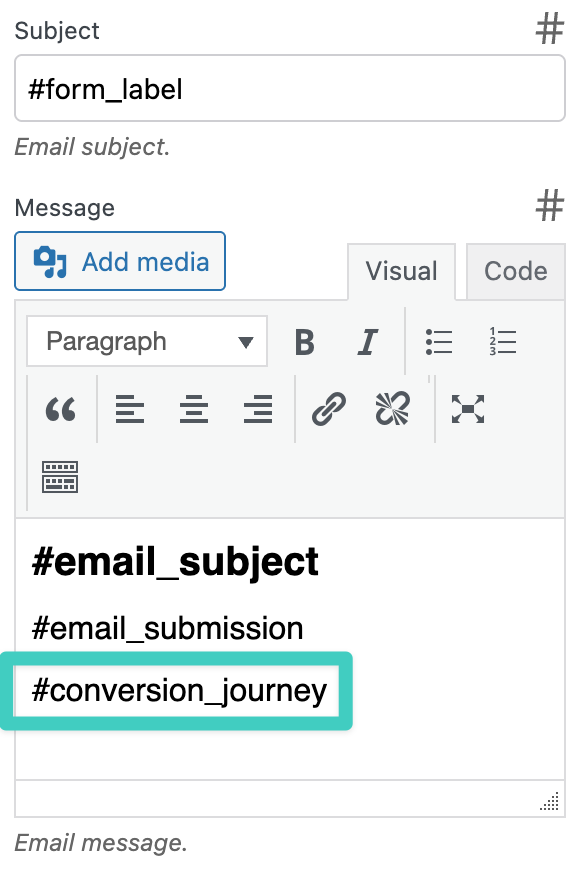
You can use the #conversion_journey variable where you would like to include the Conversion Journey in your notification email (Recommended only in admin emails).
Conversion Journey Note on Submissions
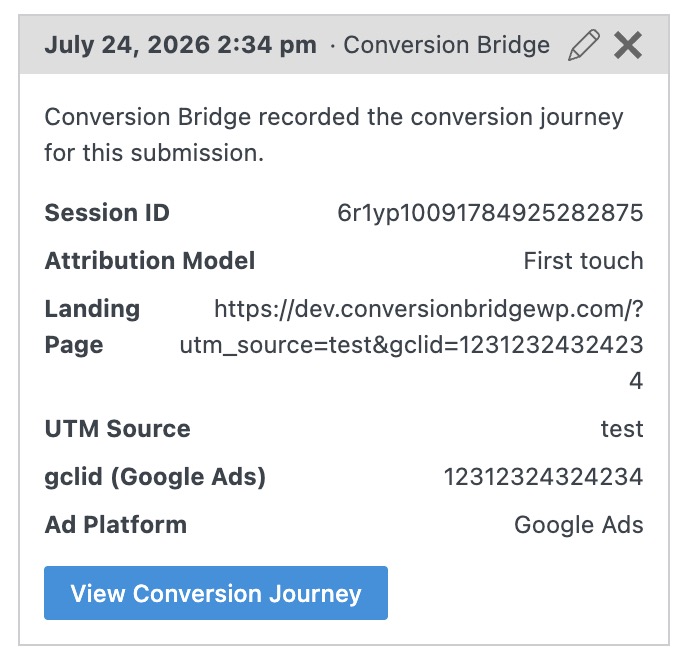
Every submission tracked by Conversion Bridge gets a note in WS Form showing where the visitor came from: their session, the attributionThe process of determining which channels, campaigns, or actions contributed to a conversion, helping you understand what influenced a visitor’s decision to take action. model, the landing page, the UTM parametersUTM parameters are tags added to a link that show where traffic comes from and which campaigns lead to real conversions., and any ad click IDs. The note also has a button that opens that visitor's full Conversion Journey, so you can see the whole path that led to the submission without leaving WS Form.
If using a Redirect action
If your form is using a Redirect action, then be sure to put the Conversion Bridge action before the Redirect action as shown in the screenshot below, otherwise users will be redirected before the conversion tracking events can take place.

UTM Tracking on Submissions
Conversion Bridge saves the visitor's UTM parameters and ad click IDs to every tracked WS Form submission automatically. There is nothing to add to the form. The values are stored as submission meta: utm_source, utm_medium, utm_campaign, utm_term, utm_content, plus any ad click IDAn ad click ID is a code an ad platform adds to your link when someone clicks your ad. It lets you connect a later conversion back to the exact ad. (like gclid or fbclid) and the ad platform it came from.
The campaign is captured when the visitor first lands on your site and stays with their conversion journey, so it is saved even when they browse several pages before submitting or come back days later on a URL with no tags. First touch gets the credit by default; you can switch to last touch in the Conversion Bridge settings.
You can see the values in the Conversion Journey note on each submission (described above), and they are added as extra columns when you export submissions to CSV from WS Form, ready for offline conversion imports.
Pass UTM Parameters and Ad Click IDs
If you want the values on the form itself, so they flow into notification emails, CRM actions, and webhooks, you can save a visitor's UTM parameters and ad click IDs to a WS Form submission by adding a Hidden field and setting its default value to a Conversion Bridge variable, like #cb_utm_source. The value is stored with the entry, included in notification emails, and sent to any CRM or webhook you have connected.
This is useful for offline conversion imports or for building conditional logic based on where the visitor came from. Ad click IDs such as #cb_gclid only fill in when the visitor has granted marketing consent. UTM parameters don't need consent on their own, but Conversion Bridge only remembers them from page to page once the visitor has accepted your banner, so before that they only fill in on the page that has them in the URL. For the full list of supported tags, see the guide on passing UTM parameters and ad click IDs into forms.