CheckoutWC
The CheckoutWC integration tracks checkout process steps for WooCommerce stores using the CheckoutWC plugin. It covers two areas of your store: the floating side cart and the checkout page.
On the checkout page, you can track when customers start checkout, select a shipping method, choose a payment method, apply a coupon, add an order bump, or remove an item from their cart. On the side cart, you can track when customers open the cart, and when items are added or removed.
Purchase tracking is handled by the WooCommerce integration, not CheckoutWC. This integration focuses on the steps that lead up to the purchase.
Setup Instructions
Step 1: Enable the Integration
- In your WordPress admin, go to Settings > Conversion Bridge > Integrations
- Find CheckoutWC in the list of available integrations
- Enable the integration by checking the checkbox
Step 2: Configure Event Tracking
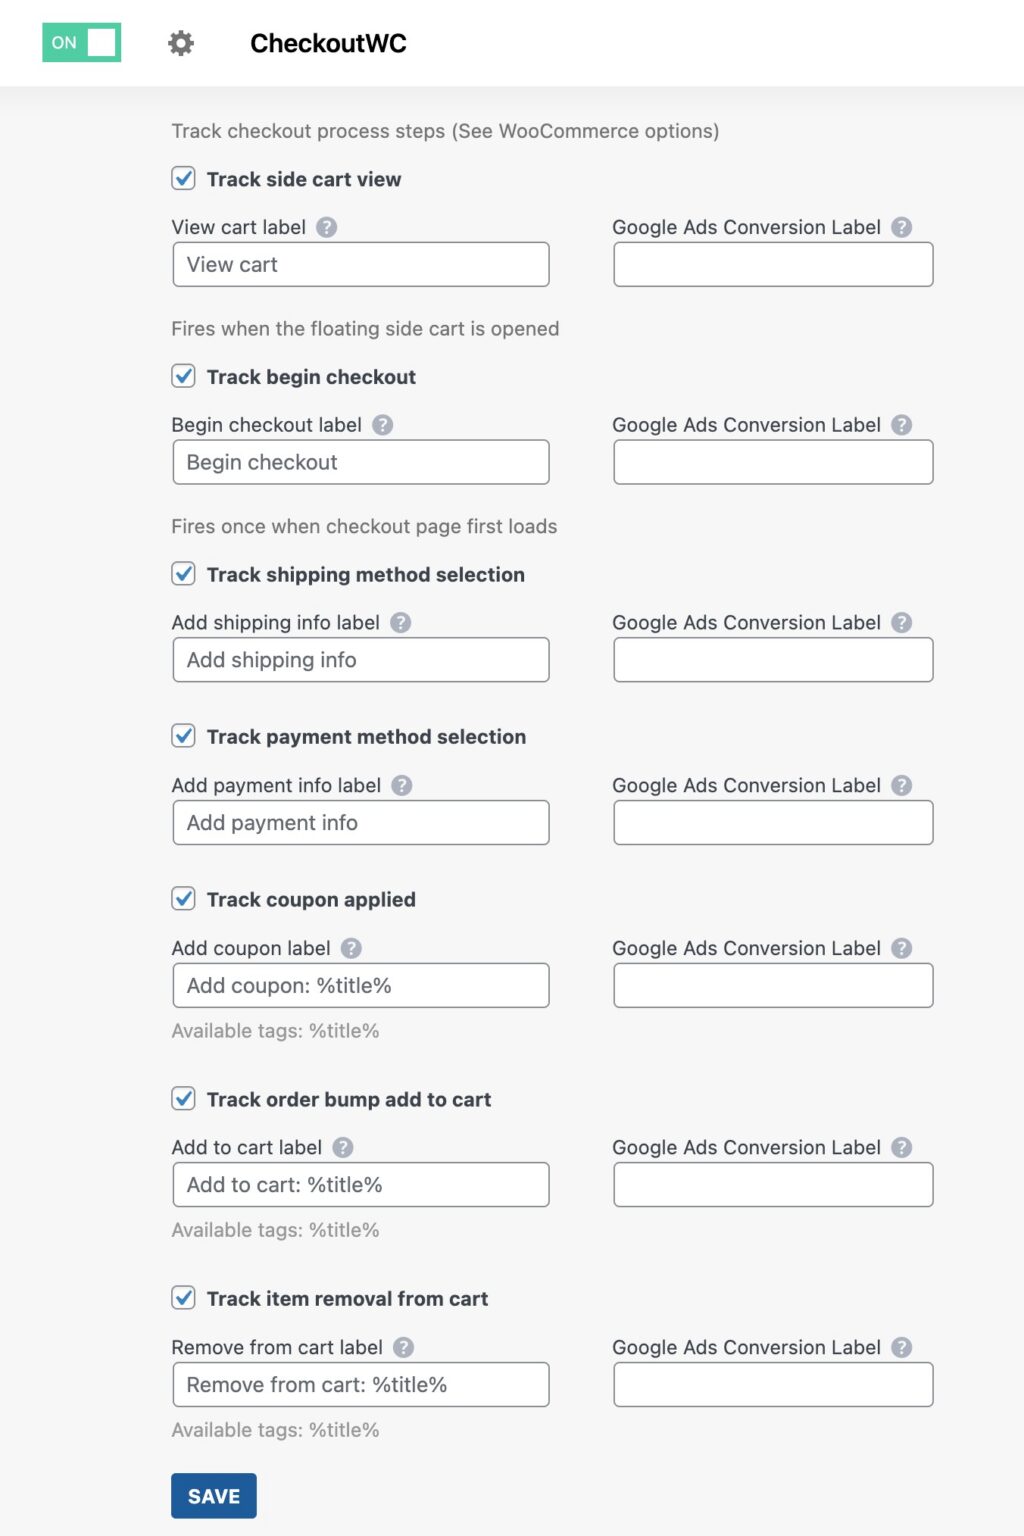
Enable the events you want to track and optionally customize their labels:
- Track side cart view -- Fires when a customer opens the floating side cart on any page
- Track begin checkout -- Fires once when the checkout page first loads
- Track shipping method selection -- Fires when the customer advances past the shipping step
- Track payment method selection -- Fires when the customer advances to the order review step, or when they click Place Order if there is no order review step
- Track coupon applied -- Fires each time a new coupon is applied during checkout
- Track order bump add to cart -- Fires when a customer checks an order bump checkbox to add a product during checkout
- Track item removal from cart -- Fires when a customer removes an item from the cart during checkout or from the side cart
Step 3: Save Settings
Click Save Changes to activate the integration.
How It Works
Checkout Page Events
The integration listens for CheckoutWC events on the checkout page and can track the following events:
- Begin checkout
- Add shipping info
- Add payment info
- Add coupon
- Add to cart (order bump)
- Remove from cart
Side Cart Events
The integration tracks events in the CheckoutWC floating side cart separately from the checkout page:
- View cart: Each time the side cart opens, the event fires. Closing and reopening the side cart fires the event again.
- Add to cart and Remove from cart: As users add or remove items in the side cart, they are also tracked.
On the checkout page itself, add to cart and remove from cart tracking is handled by the checkout page events described above, not the side cart logic.
Tracked Data
Every event includes the store currency from your WooCommerce settings.
Cart Item Data
Events that include cart items send the following details for each product:
- Item ID -- Product SKU if available, otherwise the product ID
- Item SKU -- Product SKU
- Item name -- Product name
- Price -- Item unit price
- Quantity -- Number of units in the cart
- Categories -- Product categories (item_category, item_category2, etc.)
- Brand -- Product brand if the product_brand taxonomy is available
For variable products, the following additional fields are included:
- Item variant ID -- Variation SKU if available, otherwise the variation ID
- Item variant SKU -- Variation SKU
- Item variant name -- Parent product name plus the selected attribute values
- Item variant -- The selected attribute values (e.g., "Large, Blue")
Event-Specific Data
| Event | Additional Data |
|---|---|
| Begin checkout | Cart total, full cart items array, coupon codes if applied |
| Add shipping info | Cart total, shipping method name, full cart items array |
| Add payment info | Cart total, payment method name, full cart items array |
| Add coupon | Cart total, coupon code, full cart items array |
| Add to cart (order bump) | Added item amount, added item details |
| Remove from cart | Removed item amount, removed item details |
| View cart (side cart) | Computed cart total, full cart items array |
Custom Event Labels
Each event has a customizable label. You can change these labels in the integration settings to better identify events in your analytics platforms.
Default labels:
| Event | Default Label |
|---|---|
| Side cart view | View cart |
| Begin checkout | Begin checkout |
| Shipping method selection | Add shipping info |
| Payment method selection | Add payment info |
| Coupon applied | Add coupon: %title% |
| Order bump add to cart | Add to cart: %title% |
| Item removal from cart | Remove from cart: %title% |
Using the %title% tag:
Three events support the %title% tag in their labels:
- Add coupon --
%title%is replaced with the coupon code that was applied - Add to cart (order bump) --
%title%is replaced with the name of the product added via the order bump - Remove from cart --
%title%is replaced with the name of the product that was removed
For example, if your label is Add to cart: %title% and a customer adds an order bump for "Extended Warranty," the tracked label becomes Add to cart: Extended Warranty.
Still need help?
If you have not yet found your answer in the documentation articles, please contact support
Contact support