Gravity Forms
The Gravity Forms integration tracks form submissions from the Gravity Forms plugin. Gravity Forms is one of the most popular form builder plugins for WordPress, used for contact forms, payment forms, surveys, and more.
This integration automatically tracks:
- Form submissions: When users submit any form you configure
Conversion tracking is set up on a per-form basis. You choose which forms track conversions, customize the conversion label and conversion value for each one, and send customer data to supported ad platforms with enhanced conversions.
Setup Instructions
Step 1: Enable the Integration
- In your WordPress admin, go to Settings > Conversion Bridge > Integrations
- Find Gravity Forms in the list
- Enable the integration by checking the checkbox
- Click Save Changes
Step 2: Configure Form Tracking
Conversion Bridge adds a Conversion Tracking settings tab to each Gravity Forms form. To set up tracking for a form:
- Go to Forms > Forms in your WordPress admin
- Click on the form you want to configure
- Go to Settings > Conversion Tracking
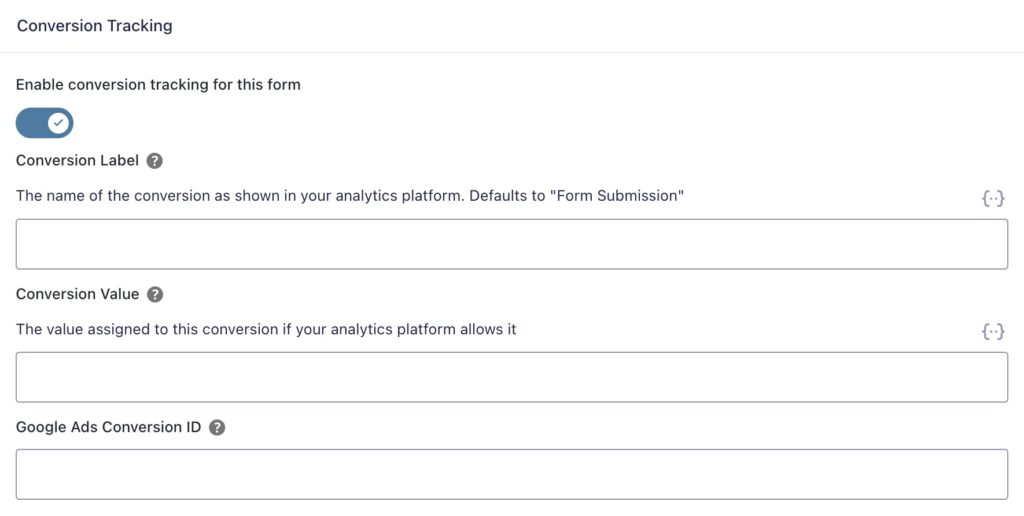
- Toggle Enable conversion tracking for this form to on
- Optionally set a Conversion Label (default: "Form Submission")
- Optionally set a Conversion Value
- If you use ad platforms that need conversion labels or IDs (like Google Ads), fill in the platform-specific fields that appear
- Click Save Settings
Step 3: Map Form Fields for Enhanced Conversions (Optional)
Enhanced conversions let you send customer data like email and name to supported ad platforms. To set them up:
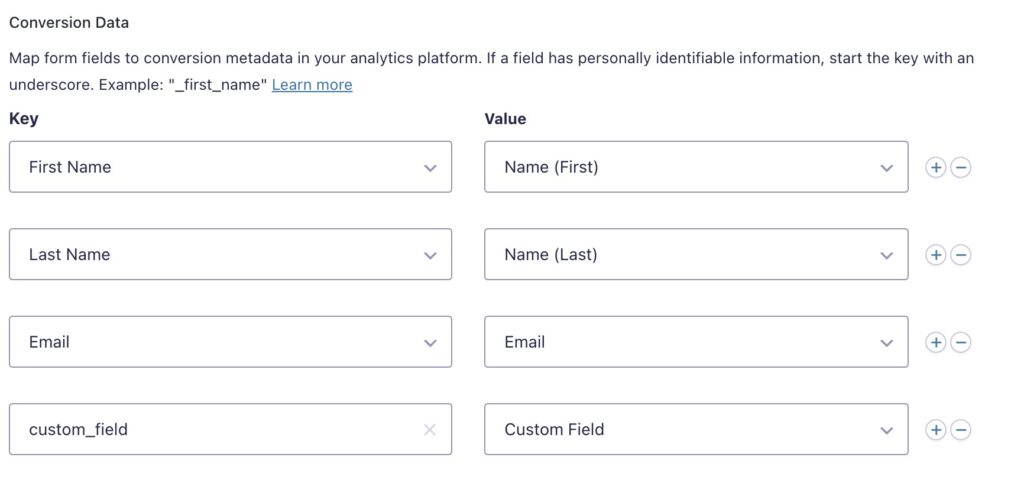
- In the Conversion Tracking settings for your form, scroll to Conversion Data
- Use the field mapping to connect your form fields to data types:
- Email: Map to your email address field
- First Name: Map to your first name field
- Last Name: Map to your last name field
- Phone: Map to your phone number field
- To add more fields, click the + button and select a form field to map
- For custom data, enter a custom key (e.g., "company" or "address"). If the field contains personally identifiable information, start the key with an underscore (e.g., "_address")
- Click Save Settings
Step 4: Test Your Form
Submit a test entry on the front end of your site and check your analytics platform to confirm the conversion event appears.
How It Works
The integration tracks form submissions using different methods depending on how your form confirmation is set up.
Forms with Message Confirmation (Default)
Most Gravity Forms show a confirmation message after submission. For these forms:
- Form Submission: The user submits the form
- Server-Side Processing: Gravity Forms processes the entry on the server
- Merge Tag Resolution: If you used merge tags in the label or value fields, they are replaced with real values from the entry
- Event Tracking: Conversion Bridge appends a tracking script to the confirmation message
- AJAX vs. Page Reload: If the form uses AJAX, the event fires right away. If the page reloads, the event fires on page load
Forms with Page or URL Redirect Confirmation
If your form redirects to another page or URL after submission, the tracking works differently:
- Form Loads: When the page with the form loads, Conversion Bridge adds a JavaScript listener
- Pre-Submission Capture: Right before the form submits, JavaScript reads values directly from the form fields
- Event Tracking: The conversion event fires before the redirect happens
- Value Parsing: If you used a merge tag for the conversion value, the integration reads the field value from the page and converts it to a number
This means conversion tracking works with all Gravity Forms confirmation types: message, page redirect, and URL redirect.
Dynamic Conversion Values with Merge Tags
You can use Gravity Forms merge tags in both the Conversion Label and Conversion Value fields. This lets you pull values directly from the form entry.
How Merge Tags Work
In the Conversion Label and Conversion Value fields, click the merge tag icon to insert any field from your form. For example:
- Use
{Total:12}to pull the total from a product field - Use
{:5}to pull the value from field ID 5 - Use any standard Gravity Forms merge tag
Currency Value Parsing
When you use a merge tag for the conversion value, Conversion Bridge automatically handles currency formatting. It strips currency symbols and formatting so the value is sent as a clean number to your analytics platforms.
For example, if a field shows $1,234.56, the integration sends 1234.56 as the conversion value. This works with any currency symbol, including $, EUR, GBP, and others.
Message Confirmations vs. Redirect Confirmations
How merge tags are resolved depends on your confirmation type:
- Message confirmation: Merge tags are resolved server-side by Gravity Forms with the actual entry data
- Redirect confirmation: The integration reads field values directly from the form inputs on the page before the redirect occurs, then parses the currency value into a number
Tracked Data
Form Submission Event
Each form submission event includes:
- Event Name:
gravityforms_submission - Event Type:
form_submit - Label: Your custom label or "Form Submission" by default
- Value: Your custom value (if set), with merge tag values resolved
- Transaction ID:
gravityforms-{entry_id}(for message confirmations) - Form Information:
- Form ID
- Form title
- Custom label
- Customer Data (if enhanced conversions configured):
- Email address (
_email)
- Email address (
- Platform-Specific Data: Any platform-specific conversion labels or IDs you configured for the form
Enhanced Conversions
Enhanced conversions let you send customer data to supported ad platforms like Google Ads and Meta Ads. This improves conversion tracking accuracy and helps platforms match conversions to the right users.
Supported Data Types
The Gravity Forms integration supports these enhanced conversion fields:
| Data Type | Key | Description |
|---|---|---|
_email | Email address field | |
| First Name | _first_name | First name field |
| Last Name | _last_name | Last name field |
| Phone | _phone | Phone number field |
| Custom | Your custom key | Any other form field |
Setting Up Enhanced Conversions
In the Conversion Data section of your form's Conversion Tracking settings:
- Select a data type from the dropdown (Email, First Name, Last Name, Phone, or add a custom key)
- Select the form field that contains that data
- Click + to add more field mappings
- If adding a custom key with personally identifiable information, prefix the key with an underscore (e.g.,
_address)
Enhanced conversion data is only sent to platforms that support it and is handled according to each platform's privacy requirements.
UTM Tracking on Entries
Conversion Bridge automatically saves UTMUTM tracking tags show where traffic comes from and which campaigns lead to real conversions. parameters from the visitor's session to each Gravity Forms entry. This lets you see exactly which campaign, source, and medium brought the visitor who submitted the form.
Saved UTM Fields
The following UTM values are stored as entry metadata:
- UTM Source (
utm_source) - UTM Medium (
utm_medium) - UTM Campaign (
utm_campaign) - UTM Term (
utm_term) - UTM Content (
utm_content)
These values come from the visitor's initial pageview session, so even if the visitor browses several pages before submitting the form, the original UTM parameters from their first visit are captured.
Viewing UTM Data
You can view UTM data for any entry:
- Go to Forms > Entries in your WordPress admin
- Click on an entry
- The UTM values appear in the entry metadata
You can also add UTM columns to the entries list to sort and filter entries by campaign source.
Conversion Journey Tracking
Conversion Bridge saves a session ID to every Gravity Forms entry. This connects each form submission to the visitor's full conversion journey -- every page they visited, where they came from, and what led them to submit the form.
Viewing the Conversion Journey
When you view a Gravity Forms entry, you will see a Conversion Journey metabox. This shows the complete path the visitor took before submitting the form, including:
- Landing page and referral source
- Pages visited
- UTM parameters
- Time on site
Using the Conversion Journey Merge Tag
The integration adds a custom merge tag you can use in Gravity Forms notifications and confirmations:
{conversion_journey}Add this merge tag to your email notifications to include the visitor's conversion journey in the email. This is useful for sales teams who want to see how a lead found your site before filling out a form.

Custom Event Labels
You can set a custom conversion label for each form. The label appears in your analytics dashboards and reports to help you tell different form conversions apart.
Default Label: "Form Submission"
Examples of custom labels:
- "Contact Form Submission"
- "Newsletter Signup"
- "Quote Request"
- "Free Trial Signup"
You can also use merge tags in the label to include dynamic data from the form entry.
Platform-Specific Conversion IDs
Some ad platforms need platform-specific conversion tracking parameters. These fields appear automatically in the form's Conversion Tracking settings when you have those platforms enabled.
Platforms that use per-form conversion labels/IDs:
- Google Ads: Set a Conversion Label for each form to specify which conversion action to record
- LinkedIn Ads: Set a Conversion ID for each form
- X (Twitter) Ads: Set a Conversion ID for each form
Not all ad platforms need these parameters. For example, Meta Ads, Microsoft Ads, Reddit Ads, and Pinterest Ads track all conversion events automatically without per-form IDs.
Complete Setup Example
Here is a full example of setting up a contact form with conversion tracking, enhanced conversions, and a dynamic value:
- Create Your Form in Gravity Forms:
- Add an Email field
- Add a Name field (first and last)
- Add a Phone field
- Add a Message field
- Add a Product or Total field (if you want a dynamic value)
- Configure Conversion Tracking:
- Go to Settings > Conversion Tracking in the form editor
- Toggle Enable conversion tracking for this form to on
- Set the label to "Contact Form Submission"
- Set the value to the merge tag for your total field, e.g.,
{Total:12}
- Map Enhanced Conversion Fields:
- In the Conversion Data section:
- Map Email to your email field
- Map First Name to your first name field
- Map Last Name to your last name field
- Map Phone to your phone field
- Set Platform-Specific IDs (if needed):
- If you use Google Ads, enter the conversion label for this form
- Save and Test:
- Click Save Settings
- Submit a test entry on the front end
- Check your analytics platform to confirm the conversion event, value, and enhanced conversion data all appear correctly
The conversion event will include:
- Label: "Contact Form Submission"
- Value: The actual total from the form (e.g.,
49.99) - Enhanced data: email, first name, last name, phone
- UTM data: saved to the entry metadata for reporting
- Conversion journey: viewable in the entry detail and available via the
{conversion_journey}merge tag
Still need help?
If you have not yet found your answer in the documentation articles, please contact support
Contact support