Divi 4
The Divi integration lets you add conversion tracking directly to your Divi modules. Instead of writing code or setting up tag managers, you enable tracking on each module right inside the Divi Builder.
This integration tracks:
- Button clicks: When visitors click a Divi Button module
- Call to ActionA prompt that encourages users to take a specific action, such as clicking a button, submitting a form, or making a purchase. clicks: When visitors click the button in a Divi Call to Action module
- Contact form submissions: When visitors submit a Divi Contact Form
- Email optin submissions: When visitors submit a Divi Email Optin form
- Addons for Divi module clicks: When visitors click buttons in InfoCard, InfoBox, FlipBox, Review, or Dual Button modules (new in 1.13)
Setup Instructions
Step 1: Enable the Integration
- In your WordPress admin, go to Settings > Conversion Bridge > Integrations
- Find Divi in the list of available integrations
- Enable the integration by checking the checkbox
- Click Save Changes
Step 2: Enable Tracking on Individual Modules
The Divi integration works on a per-module basis. You turn on tracking for each module where you want to track conversions.
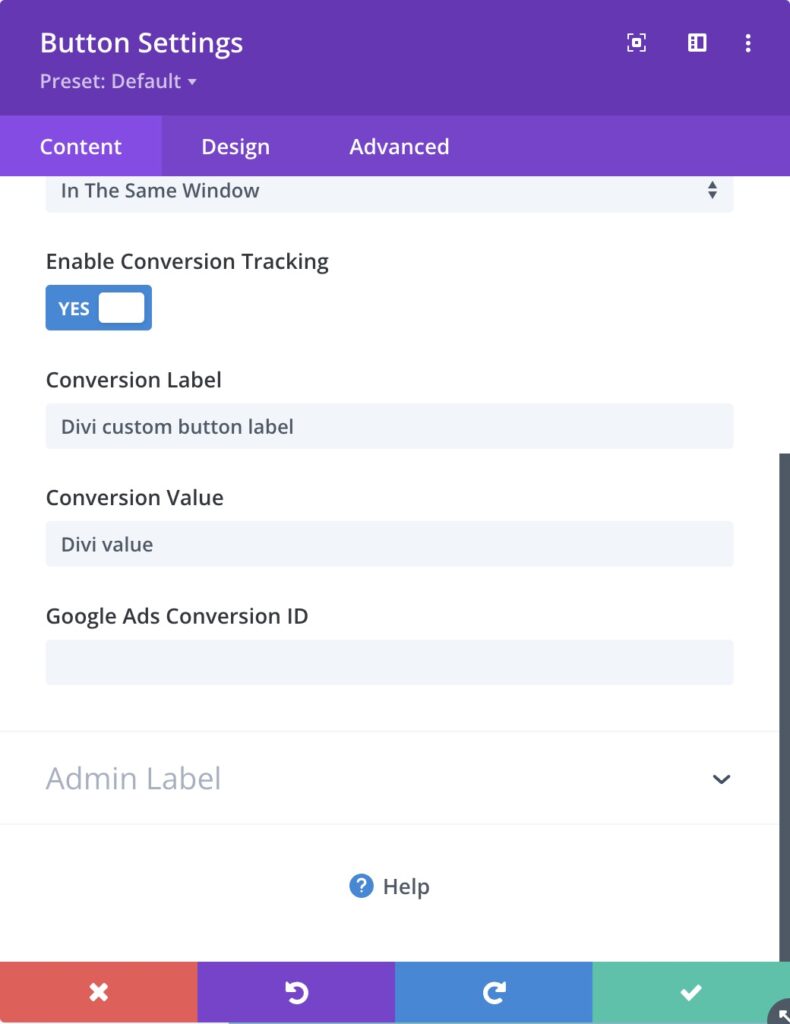
Button Module
- Open the Divi Builder and select your Button module
- Go to the Link settings tab
- Set Enable Conversion Tracking to Yes
- Optionally set a Conversion Label (defaults to "Click")
- Optionally set a Conversion Value
Call to Action Module
- Select your Call to Action module
- Go to the Link Options settings tab
- Set Enable Conversion Tracking to Yes
- Optionally set a Conversion Label (defaults to "Click")
- Optionally set a Conversion Value
Contact Form Module
- Select your Contact Form module
- Go to the Content settings tab
- Set Enable Conversion Tracking to Yes
- Optionally set a Conversion Label (defaults to "Form Submission")
- Optionally set a Conversion Value
Email Optin Module
- Select your Email Optin module
- Set Enable Conversion Tracking to Yes
- Optionally set a Conversion Label (defaults to "Form Submission")
- Optionally set a Conversion Value
Addons for Divi Modules (New in 1.13)
If you use the Addons for Divi (Divi Torque) plugin, Conversion Bridge also supports these modules:
- InfoCard: Tracking settings appear under the Button tab
- InfoBox: Tracking settings appear under the Button tab
- FlipBox: Tracking settings appear under the Button tab
- Review: Tracking settings appear under the Button tab
- Dual Button: Each button (Button A and Button B) has its own tracking settings under the Content tab
For InfoCard, InfoBox, FlipBox, and Review modules:
- Select the module in the Divi Builder
- Go to the Button settings tab
- Set Enable Conversion Tracking to Yes
- Optionally set a Conversion Label and Conversion Value
For the Dual Button module:
- Select the Dual Button module in the Divi Builder
- Under the Content tab, find the Button A sub-toggle
- Set Enable Conversion Tracking to Yes for Button A
- Optionally set a Conversion Label and Conversion Value for Button A
- Repeat for Button B if you want to track both buttons
You can track one button, both buttons, or neither. Each button gets its own label, value, and platform-specific settings.
How It Works
Click Tracking (Button and Call to Action)
When a visitor clicks a tracked button:
- Click Detected: Conversion Bridge listens for a click on the button element
- Event Fired: A click conversion event is sent to all your connected platforms
- Data Included: The event includes the button URL, button text, your custom label, and value
Form Submission Tracking (Contact Form and Email Optin)
When a visitor submits a tracked form:
- Submit Detected: Conversion Bridge listens for the form submit button click
- Event Fired: A form submission event is sent to all your connected platforms
- Data Included: The event includes your custom label, value, and any enhanced conversion data
Addons for Divi Click Tracking
When a visitor clicks a tracked Addons for Divi button:
- Click Detected: Conversion Bridge listens for a click on the specific button element
- Event Fired: A click conversion event is sent to all your connected platforms
- Data Included: The event includes the button URL, button text, your custom label, and value
For the Dual Button module, each button fires its own separate event with its own label and value.
Tracked Data
Click Events (Button, Call to Action, Addons for Divi Modules)
Each click event includes:
- Label: Your custom label or "Click" by default
- Value: Your custom conversion value (optional)
- URL: The button's destination URL
- Button Label: The text displayed on the button
- Platform-Specific Fields: Any platform-specific values you set (such as Google Ads conversion labels)
Form Submission Events (Contact Form, Email Optin)
Each form submission event includes:
- Label: Your custom label or "Form Submission" by default
- Value: Your custom conversion value (optional)
- Email: The visitor's email address from the form (for enhanced conversions)
- Phone: The visitor's phone number from the form (for enhanced conversions)
- Platform-Specific Fields: Any platform-specific values you set
Enhanced Conversions
The Divi integration supports enhanced conversions for Contact Form and Email Optin modules. When a visitor submits a form, Conversion Bridge automatically captures:
- Email address: From any field with the "email" field type
- Phone number: From any field with the "phone" field type (new in 1.13)
This data is sent to platforms that support enhanced conversions (such as Google Ads and Meta Ads) to improve conversion tracking accuracy and attributionThe process of determining which channels, campaigns, or actions contributed to a conversion, helping you understand what influenced a visitor’s decision to take action.. No extra setup is needed. As long as your form has an email or phone field, Conversion Bridge handles the rest.
Note: Enhanced conversion data is only sent to platforms that support it and is handled according to each platform's privacy requirements.
Custom Event Labels
You can set a custom Conversion Label on every tracked module. This label appears in your analytics platforms to help you tell events apart.
Some examples of useful labels:
- "Contact Form - Homepage" for a contact form on your home page
- "Get Started Button" for a call to action button
- "Request Quote" for a form that collects quote requests
- "InfoCard CTA" for an Addons for Divi InfoCard button
If you leave the label blank, Conversion Bridge uses a default:
- Click events: "Click"
- Form submission events: "Form Submission"
You can also set a Conversion Value on each module. This is useful when you know the dollar amount a conversion is worth. For example, if a form submission is worth $50 on average, you can set the value to 50.
Platform-Specific Fields
When you enable conversion tracking on a module, you may see additional fields for specific platforms. For example, if you use Google Ads, you may see a field for the Google Ads conversion label. These fields let you map the Divi event to a specific conversion action in that platform.
Still need help?
If you have not yet found your answer in the documentation articles, please contact support
Contact support