
Most guides on how to add Google Analytics to WordPress end at the same place: paste a snippet of code, see pageviews show up, done. That gets you a visitor count, and a visitor count is not what you installed analytics for. You wanted to know which pages lead to a form submission, which campaigns bring in orders, and what's worth spending more on. The GA4 tag by itself can't answer any of that, because those things happen inside your plugins, not on a page load.
So the five ways of adding Google Analytics to a WordPress site are not equal. I've been building WordPress sites for over twenty years and I've used every one of them. They all get the tag on the page, and the reason to pick one over another is what it lets you track after that.
What you need first
Before you add GA4 to WordPress by any method, you need a GA4 property and its Measurement ID. The Measurement ID is the code that tells Google which property your site's data belongs to. It always starts with G- followed by letters and numbers, like G-ABC123XYZ.
If you don't have a property yet, go to analytics.google.com, sign in with a Google account, and create one. Google will ask for a property name, your time zone, your currency, and then the website address. That last step creates what GA4 calls a "web data stream," and the Measurement ID appears on the stream's details screen as soon as it's created.
If the property already exists, the ID is a few clicks away:
- In Google Analytics, click Admin (the gear icon in the bottom left)
- Under Data collection and modification, click Data Streams
- Click your web stream
- Copy the Measurement ID at the top right of the panel
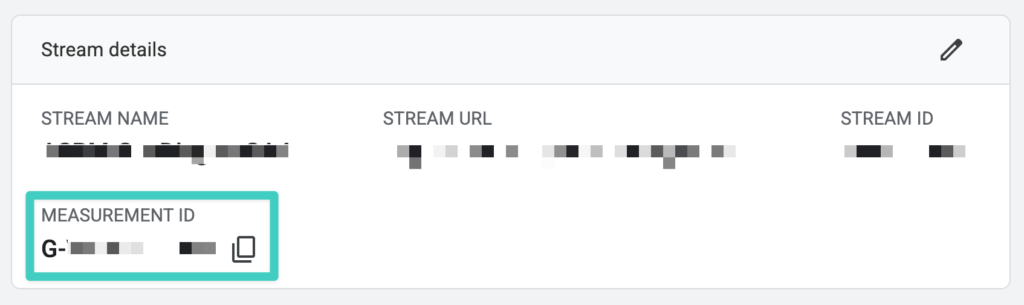
The Property ID shown elsewhere in Admin is a different number (all digits). The one you want, whichever method you use, is the Measurement ID that starts with G-.
Method 1: Paste the tag into your theme or a code snippets plugin
Every GA4 web stream has a snippet of code Google calls the "Google tag." You can find it on the data stream screen under View tag instructions, then Install manually. Paste that snippet into the <head> of your theme and the tag is live. Search for how to insert Google Analytics in WordPress and this is the method most tutorials lead with, and it's the one I used for years before anything better existed.
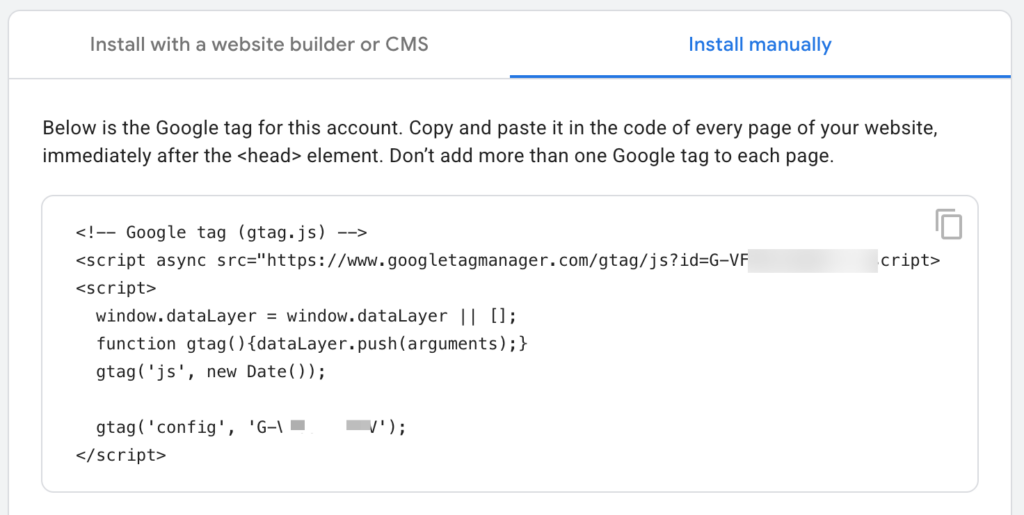
Where you paste it decides how long it lasts. If it goes directly in your theme's header.php, the next theme update overwrites the file and the tracking is gone. A child theme survives updates, and many themes have a "header scripts" field in the customizer that does too. Block themes have no header.php to edit at all, so if you're working out how to put Google Analytics on WordPress with a block theme, you'll end up in a code snippets plugin, which is a small plugin whose only job is to hold code like this and print it in the head.
Any of those versions gets pageviews into GA4, and then two problems show up.
It stops at pageviews
A pasted tag knows a page loaded and nothing else. Your form submissions, orders, signups and downloads happen inside plugins, and the tag has no idea they occurred. Getting those into GA4 by hand means writing event code for each plugin, which is the work you were hoping to avoid.
Nobody can see it later
The second problem shows up months or years on. I've picked up sites where a new marketing team came in, couldn't find where Google Analytics was set up, and installed it again their own way. Sometimes that's the same property added twice, so every pageview counts double and the reports look healthier than they are. Sometimes it's a brand new property, and the years of history in the old one are orphaned. A tag buried in a theme header or a snippets plugin is invisible to the next person, and there is always a next person.
So the manual method works, and it's fine for a personal blog with nothing to track. For a site that exists to generate leads or sales, it's a starting point you'll want to move past.
Method 2: Google Tag Manager
Google's own setup screens push Google Tag Manager (GTM) hard, and most articles on the subject repeat the advice: install GTM first, then add GA4 inside it. Reading them you'd think it was the only proper way to do this. For most WordPress sites it isn't, and it was never designed for them.
GTM is a container that holds your tags. You add the container snippet to the site once, then manage GA4, ad pixels and anything else inside the GTM interface without touching the site's code again. That solves a real problem, but it's a big-company problem. GTM exists so that a marketing team at a large organization can add and change tracking without filing a ticket and waiting on the web developers. When there are dozens of people involved in a site and every code change goes through a release process, that separation earns its keep.
That is not the situation on most WordPress sites. They're run by the owner, or by a small agency, and the person who wants the tracking is the same person (or sits next to the person) who can install a plugin. There's no queue of developers to route around. What GTM adds in that setting is a second interface to learn, with its own triggers, variables and a publish step, and every conversion you want to track still has to be wired up by hand inside it. The container snippet also has to get onto the page somehow, so you're back to Method 1 to place it, and then configuring GA4 inside GTM as a second job.
None of that is required to run Google Analytics on WordPress sites, or Google Ads either. Both work fine with the tag placed directly, and conversions can be sent directly too. I wrote about this at more length in Do you actually need Google Tag Manager on your WordPress site?, and for most sites the answer is no.
Where GTM does earn its place is when you already have a GTM setup for other reasons, or an agency manages your tags across many sites and wants a single place to do it. In that case the WordPress side of the job is only getting the container snippet onto the page and pushing useful data into the dataLayer. Conversion Bridge can do that part for you, sending page details and conversion events to the dataLayer so your GTM tags have something to work with.
Method 3: Google Site Kit
Site Kit is the Google Analytics WordPress plugin by Google itself, and it's free. You install it, sign in with your Google account, and it connects Search Console, Google Analytics, PageSpeed Insights and AdSense. Once Analytics is connected it places the GA4 tag for you, and it shows a summary of visitors, top content and search queries on your WordPress dashboard.
It does a bit more than place the tag. Recent versions added plugin conversion tracking, which can send events from a set of supported plugins into Google Analytics and Google Ads. Today that list is Contact Form 7, MailChimp, OptinMonster, Popup Maker, WPForms, WooCommerce, Ninja Forms and Easy Digital Downloads. You turn it on under Site Kit's settings for Analytics or Ads, and it only adds tracking code for plugins it finds active on the site.
Site Kit is a good fit when Google is the whole picture. If you want Search Console data next to your posts, you run AdSense, and your forms or store are on its supported list, it covers a lot for free. Where it stops is anything outside Google and any plugin not on that list of eight. It won't send a conversion to Meta, TikTok or Microsoft Ads, and it won't report to a privacy-focused analytics platform like Fathom, Plausible or Umami, the way Conversion Bridge does. I've written up a fuller Site Kit vs Conversion Bridge comparison if you're weighing the two.
You can also run Site Kit alongside another GA4 plugin like Conversion Bridge, and the two get along fine. A possible setup is Site Kit for the Search Console and AdSense widgets and Conversion Bridge for the tag and the conversion events. The one thing to get right is that only one of them places the GA4 tag, or every pageview counts twice. Either leave Analytics unconnected in Site Kit, or connect it and check the Exclude script tag setting in Conversion Bridge so it keeps sending conversions without adding a second tag.
Method 4: Your cookie consent plugin
Some cookie consent plugins will add Google Analytics for you. Complianz and GDPR Cookie Compliance both have a field for your Measurement ID, and once it's saved they place the GA4 tag and hold it back until the visitor accepts cookiesA small piece of data stored in a user’s browser that helps websites remember user activity, preferences, or sessions across visits.. If you need a banner anyway, it looks like a tidy way to get two jobs done with one plugin.
The consent part is what these plugins are built for, and they do it well. Analytics is a side feature. You get the tag and your pageviews, and that's where it stops. A cookie banner has no idea when a form is submitted or an order is placed, so no conversions reach GA4. There are no event details either, like the form name, the order total or the products in the cart, and none of the setup that makes GA4 reports useful, such as custom dimensions or debug mode. It's Method 1 with a consent check in front of it.
The better split is to let each plugin do the job it's good at. Keep the banner for consent, and let a Google Analytics plugin place the tag and send the conversions. Conversion Bridge works with 16 cookie consent plugins, including Complianz and GDPR Cookie Compliance, so the tag still waits for consent. If you go this way, turn off Google Analytics in the banner's settings so only one plugin places the tag, or every pageview counts twice.
Method 5: A Google Analytics plugin for WordPress
A WordPress Google Analytics plugin is the fastest way to add Google Analytics to WordPress, and it's the method I'd point most site owners to, because the right one gets you more than pageviews with the least work. You paste the Measurement ID into a settings field (or sign in with Google and pick the property from a list), save, and the tag is on every page. Nothing in your theme is touched, so the tracking survives theme updates and theme switches.
There are a lot of Google Analytics plugins for WordPress. What separates them is what happens after the tag is in place. Some stop there. Some show a traffic report in your WordPress dashboard. Some, like Conversion Bridge, go on to send events from your other plugins to GA4, so a form submission or an order, with all of its details attached, shows up as a conversion and not only as a pageview. With that in GA4, you get real reports on what is and isn't working on your site: which pages, campaigns and sources lead to the form fills and orders, not only to the visits. You don't even have to open GA4 to read them, since Conversion Bridge adds a Google Analytics dashboard inside the WordPress admin that shows traffic and conversion events side by side, and can be filtered by conversion event.
With Conversion Bridge you can connect GA4 to WordPress by signing in with Google and picking the property from a list. The Measurement ID, API access and custom dimensions are set up for you. The Google Analytics 4 setup doc walks through it.
A plugin is the right call if you don't want to edit code, if you switch themes now and then, or if you want conversions tracked and not only visits. The only real cost is one more plugin on the site, and a good one adds a single small script tag and nothing else on the front end.
If you build sites for clients, there's a further benefit. Every project runs a different mix of plugins, and with Conversion Bridge the conversion setup is the same on all of them regardless of which form, store or membership plugin the client happens to use. It becomes one of your stack plugins, the way your page builder, form plugin and SEO plugin already are: installed on every build, set up the same way each time, and your team only has to learn it once. Agencies can use it on their own site free as well.
How to check Google Analytics is working
After you install GA4 on WordPress, you can wait a day for the standard reports to fill in if you're patient. If you're not, GA4's Realtime report shows activity within seconds and is the quickest way to confirm the tag is on the page.
- Open your site in a private or incognito browser window
- In Google Analytics, go to Reports, then Realtime
- Watch for your own visit to appear in the "Active users in last 30 minutes" count and in the pageview events
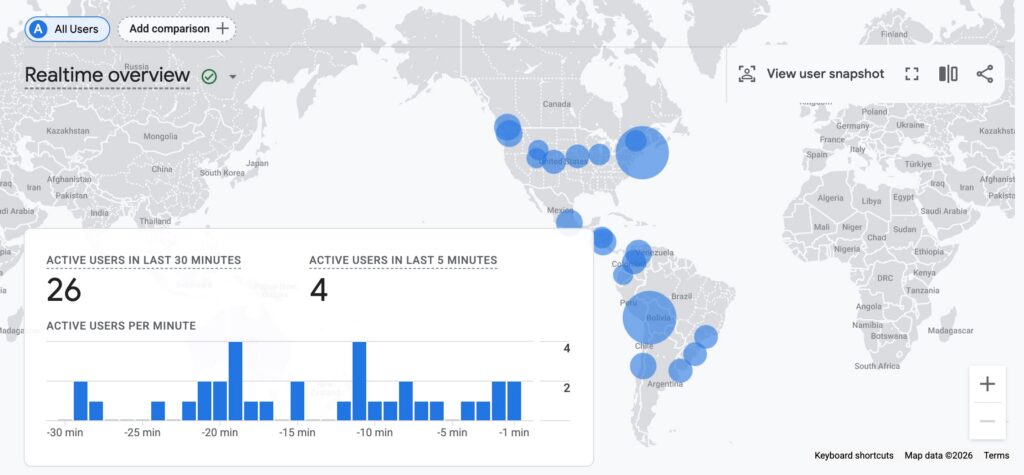
If nothing shows up, the usual causes are a typo in the Measurement ID, a caching plugin serving an old copy of the page, an ad blocker in the browser you're testing with, or a cookie consent banner that's holding the tag back until you accept. Try accepting the banner, clearing your cache, and loading a page again.
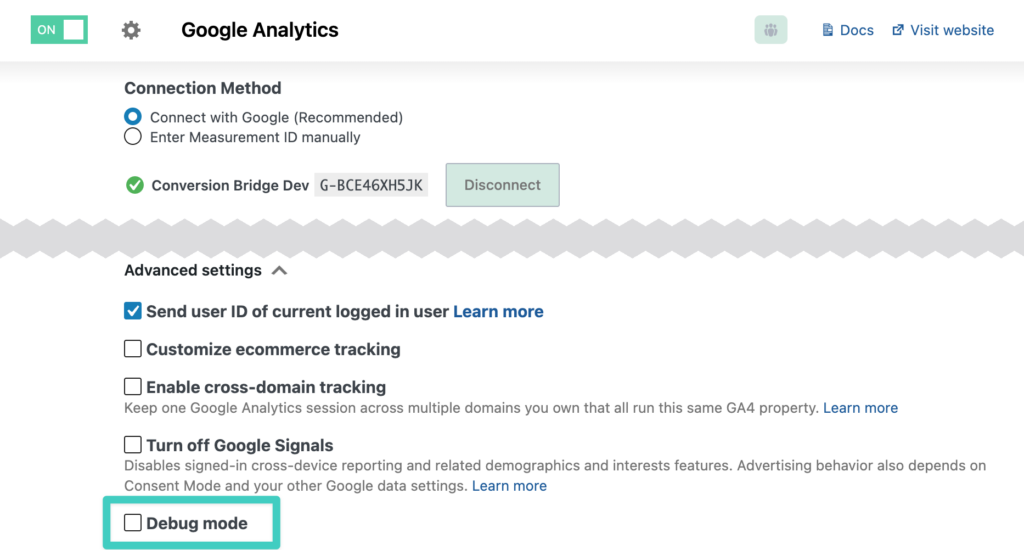
For anything beyond "is the tag there," I recommend DebugView. It's under Admin in GA4 and shows every event as it arrives, with all the parameters attached, so you can see that a form submission came through with the right form name or that a purchase carried the order total. Turning it on normally means adding a debug parameter to your tag. In Conversion Bridge it's a single Debug mode checkbox, and you can limit it to certain user roles so only you are sending debug events.
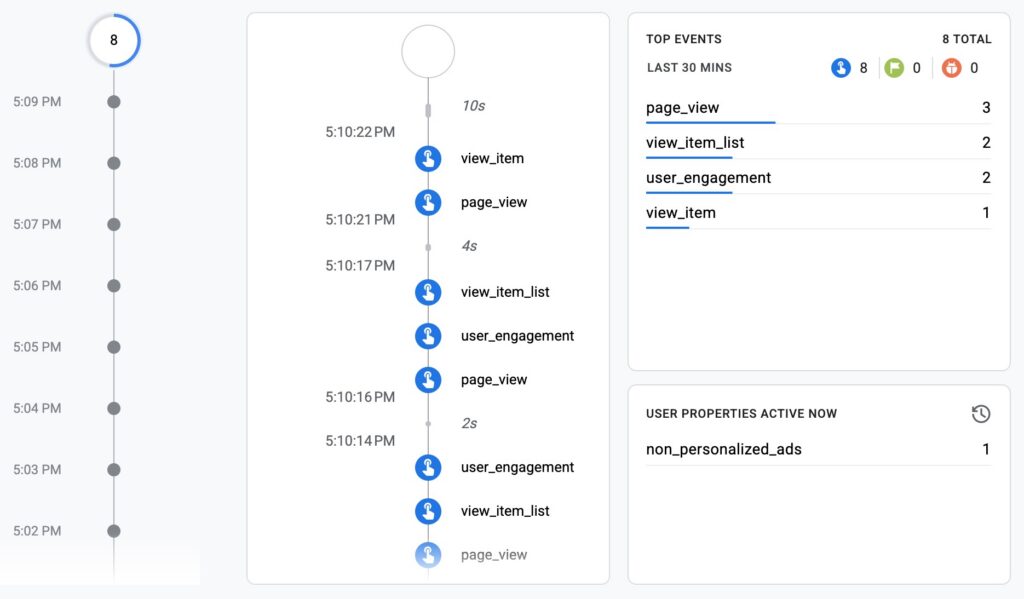
A browser extension is handy for the same job. Google's own Tag Assistant connects to your site and lists every Google tag on the page and each event it sends. Extensions like Debugger for Google Analytics 4 or one of the GA4 checker extensions do a lighter version of that from the toolbar, showing you the Measurement ID that fired and the events behind it without opening GA4 at all.
The standard reports (Reports, then Engagement, and so on) take longer to fill in. Data usually appears within a day, so don't judge the setup by those on the first afternoon.
What the tag alone doesn't give you
A pasted tag, a GTM container with only GA4 in it, a cookie banner with GA4 switched on, and Site Kit on a site without one of its supported plugins all end in the same place: pageviews are flowing into GA4. That's real and useful, and for a content site with nothing to sell it may be all you need.
It's also where most setups stop, and it's short of what the site owner actually wanted. GA4 records that someone viewed the contact page. It does not know that they filled in the form, or that the form was a quote request and not a newsletter signup. It sees the checkout page and the thank-you page, but not the order total, the products, or whether a coupon was used. The tag reports pages, and your conversions happen inside plugins.
Turning those plugin events into GA4 conversions means something has to detect them and send them along, and making that part easy is the whole reason I built Conversion Bridge. Site Kit does it for its eight plugins. Conversion Bridge does it for 71 WordPress plugins, covering forms, ecommerce, memberships, courses, bookings and donations, and sends the same events to 19 analytics platforms and 11 ad platforms at once. Purchases go across with the order value and line items, form submissions carry the form name, and each conversion keeps the pages that visitor saw before converting.
If you're new to the idea of conversions versus pageviews, What is conversion tracking? covers it in plain terms, and the getting started guide shows the setup from the first click.
Getting Google Analytics on WordPress is the easy part, and any of the five methods will do it in a few minutes. Conversions are what you're actually after, so pick the method that gets you there. Happy tracking!