
As of v1.11, Google Tag Manager is it's own integration instead of being combined with Google Analytics. This allows for you to use Conversion Bridge for most of your needs but also include Google Tag Manager for the other use cases you may find it necessary.
Conversion Bridge works best when it connects directly to each analytics and ad platform. A direct integration cuts your setup time significantly because Conversion Bridge already formats every event the way each platform expects. With Google Tag Manager you still have to wire that data up yourself. If you put your Meta Pixel in GTM, for example, you still need to build the trigger, add the tag, and map the conversion values into the format Meta requires. A direct Conversion Bridge integration does all of that mapping for you.
For that reason it is recommended to use the direct Google Analytics integration, or any of the other analytics or ad platform integrations within Conversion Bridge, instead of Google Tag Manager. If you want a fuller comparison, see Conversion Bridge as a Google Tag Manager alternative. When you do use GTM, review the extra setup steps required for each conversion event.
Where do I find my Google Tag Manager Container ID?
Google Tag Manager (GTM) is another way of adding tracking scripts to your website. If all you are using GTM is to add Google Analytics and Google Ads, the Default method is recommended when using Conversion Bridge.
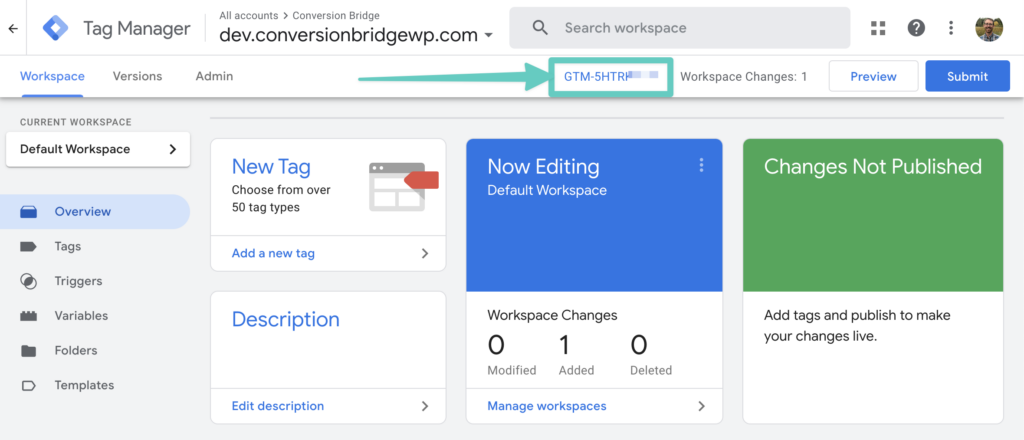
To find your Measurement ID for GTM, login to your Google Tag Manager account and find the ID as shown in the screenshot below. It should look like "GTM-XXXXXXXX":
What are the extra properties?
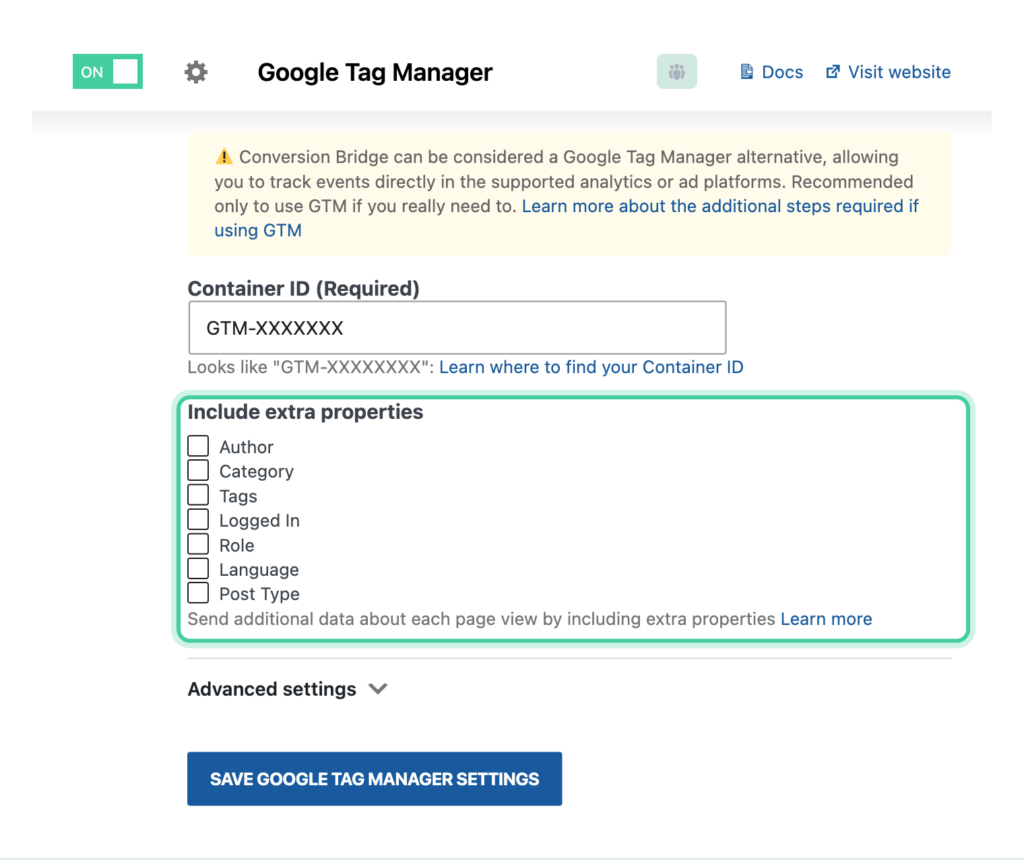
These are custom dimensions you can track in GA4 to get more detailed insights about your WordPress site’s content and users or create more unique Key Events. Instead of just seeing pageviews, you can attach extra info—like who wrote the post, what category it’s in, or whether the visitor is logged in. This gives you more ways to break down your reports and understand how different types of content and users behave.
Here are the additional properties you can track:
- Author: Track which authors drive the most traffic or engagement. Helpful for blogs, news sites, or multi-author publications.
- Category: See which content categories perform best. Helps you plan future content around what your audience cares about most.
- Tags: Like categories, but more specific. Great for understanding niche interests and refining your content strategy.
- Logged In: Track behavior differences between logged-in users (like customers or members) and general visitors.
- Language: Useful for multilingual sites. Helps identify which languages your audience prefers and how they behave.
- Post Type: Distinguish between blog posts, pages, products, or any custom post types. Lets you analyze performance by content type.
What gets sent to the dataLayer
Conversion Bridge pushes two kinds of things to the dataLayer: details about the page someone is viewing, and details about a conversion when one happens.
On page load, you get whatever extra properties and user info you turned on in the settings above. Nothing is pushed if you have both turned off.
When one of your integrations reports a conversion, Conversion Bridge pushes a single event you can build a trigger from. Every conversion push includes:
- event: the event name, such as
generate_leadorpurchase. This is what you build your GTM trigger on. - label: the name of whatever converted, like the form name or the product name.
- Details about the conversion itself. A form submission adds
form_idandform_name, a registration addsmethod, and so on.
A few event names are renamed to match what Google expects. Form submissions become generate_lead, registrations become sign_up, and bookings and donations become purchase. Every other event keeps the name the integration reported.
Shop events
Purchases and other store activity put their details inside an ecommerce object, already in the format GA4 expects. It holds items, value, currency, transaction_id, coupon, shipping, and tax, depending on what the store recorded.
The events that use it are view_item, view_item_list, select_item, add_to_cart, remove_from_cart, view_cart, begin_checkout, add_payment_info, add_shipping_info, and purchase.
Customer data
If the integration collected customer details, they get pushed alongside the event. Keys only appear when there is a value for them, so what you get depends on the form or checkout. A short contact form might send an email address and a name, while a checkout usually sends everything in the table below.
| Key | What it holds | Hashed |
|---|---|---|
email_hashed |
Email address | Yes |
first_name_hashed |
First name | Yes |
last_name_hashed |
Last name | Yes |
phone_hashed |
Phone number, converted to international format first, like +15551234567 | Yes |
address_hashed |
Street address | Yes |
city |
City | No |
state |
State or region | No |
postal_code |
ZIP or postal code | No |
country |
Country | No |
Hashing turns the value into a scrambled string that cannot be read or reversed, which is what ad platforms require. The location fields are the exception. Google asks for city, state, postal code, and country in plain text so it can match on them, so those four are pushed as they are.
Values are cleaned up before hashing, the same way Google and the other ad platforms ask for. That matters because a hash only matches if both sides scrambled the exact same text, so (555) 123-4567 and +15551234567 have to be made identical first.
Sending your own fields
Most form integrations let you pick which of your form fields holds the email address, name, phone number, and so on. You can also send fields of your own choosing. How you set that up depends on which form plugin you use, so check that plugin's own documentation for where the option lives.
See sending custom form data with conversion events for the key names to use. Anything you send arrives in the dataLayer under the same name, minus the leading underscore that marks it as personal data. So a custom _membership_level field shows up as membership_level.
Form Submit Event Name
When one of your integrations reports a form submission, Conversion Bridge pushes an event to the dataLayer so you can build a GTM trigger from it. New sites use generate_lead, which matches GA4's recommended event name. If your site was set up before that became the default, Conversion Bridge keeps pushing form_submit so your existing GTM triggers keep firing. You can switch to generate_lead in the Google Tag Manager settings, but any triggers built on form_submit will need to be updated to the new name.
The setting lives under Advanced settings in the Google Tag Manager panel. Google Analytics has the same setting, and the two are set separately.
Do I need to exclude the script tag?
By default, Conversion Bridge will add the core JavaScript tag to your website for the basic page view tracking. However, if you have used another plugin like Google Site Kit (or any other plugin) to connect Google Tag Manager to your site, you can exclude Conversion Bridge from also adding this tracking script and causing double tracking.
Consent Mode for GTM Tags
When you have a cookie consent banner enabled in Conversion Bridge, the Google Tag Manager integration automatically forwards visitor consent decisions to GTM using Google Consent Mode v2. This means any tag you have inside GTM that respects consent (Google Analytics, Google Ads, Floodlight, and other Google products) will receive the right consent signals without any extra setup.
How it works:
- On every page load, Conversion Bridge sets the default consent state in GTM based on your banner's defaults.
- When a visitor accepts or declines specific consent categories, Conversion Bridge sends a consent update to GTM in real time.
- Tags inside GTM either run or stay blocked based on the visitor's choice.
This works even in a few edge cases that used to be tricky:
- GTM script excluded — If you've turned off the GTM script tag option (because another plugin is loading GTM), the Consent Mode bridge still runs.
- Banner deployed inside GTM, not as a WordPress plugin — If you've configured a CookieYes (or similar) banner inside GTM itself rather than as an active WordPress plugin, Conversion Bridge still bridges consent signals when it sees the banner configuration in settings.
- Tags that use
gtag("consent", "update", …)directly — Consent updates that come through asgtagcalls (the standard format Google's own documentation uses) are now read in addition to the object-form pushes that earlier versions supported.
If you prefer your consent banner to manage Google Consent Mode itself, set the Consent Signal Ownership for Google Tag Manager to Consent Banner in the Conversion Bridge consent settings. Conversion Bridge will stop sending consent signals to GTM and leave that responsibility to the banner.