Google Tag Manager Conversion Tracking Setup
If you're using Google Tag Manager (GTM) with Conversion Bridge, you can track form submissions, purchases, product views, and other conversion events by listening for custom events pushed to the dataLayer. This gives you full control over how and when events are sent to Google Analytics 4 (GA4) and other platforms but at the expense of requiring a lot of additional setup because GTM doesn't automatically recognize custom events.
The steps below use GA4 as the example, but the same work applies to every platform you send conversions to. Meta Pixel, Google Ads, and others each need their own tag type and their own parameter mapping inside GTM, and you repeat the trigger and tag setup for each one. A Meta purchase, for instance, needs its values mapped into the format Meta expects, including hashed customer data for enhanced matching, before it tracks correctly.
The Default method is the preferred integration method as this embeds just GA4 and sends conversions directly to it without the need for these additional GTM setup steps. A direct Conversion Bridge integration already knows each platform's format, so you enter your tracking ID, turn on your plugins, and conversions flow to that platform without any of these GTM steps.
Here are the additional steps needed to track a custom event in GTM which will need to be repeated for every custom event type you want to track:
Step 1: Enable GTM in Conversion Bridge
In the Conversion Bridge settings:
- Go to the Tracking Method section
- Choose Google Tag Manager
This ensures all event data is sent to dataLayer.push() instead of GA4 directly.
Step 2: Add a Custom Event Trigger in GTM
For every event you want GTM to listen for (like form_submit or purchase), you need to set up a custom trigger.
- Go to your GTM dashboard
- Click Triggers
- Click New
- Choose Trigger Type: Custom Event
- In Event name, enter the name exactly as it's used in Conversion Bridge (e.g.,
form_submit) - Under This trigger fires on, choose:
- All Custom Events (to catch every event of this type)
- or use conditions like
form_id equals 1if you want to narrow it - Save the trigger (e.g., name it "CB - Form Submit")
For all possible ecommerce events, the recommended trigger Event Name is:
view_item|select_item|add_to_cart|remove_from_cart|view_cart|begin_checkout|add_payment_info|add_shipping_info|purchase

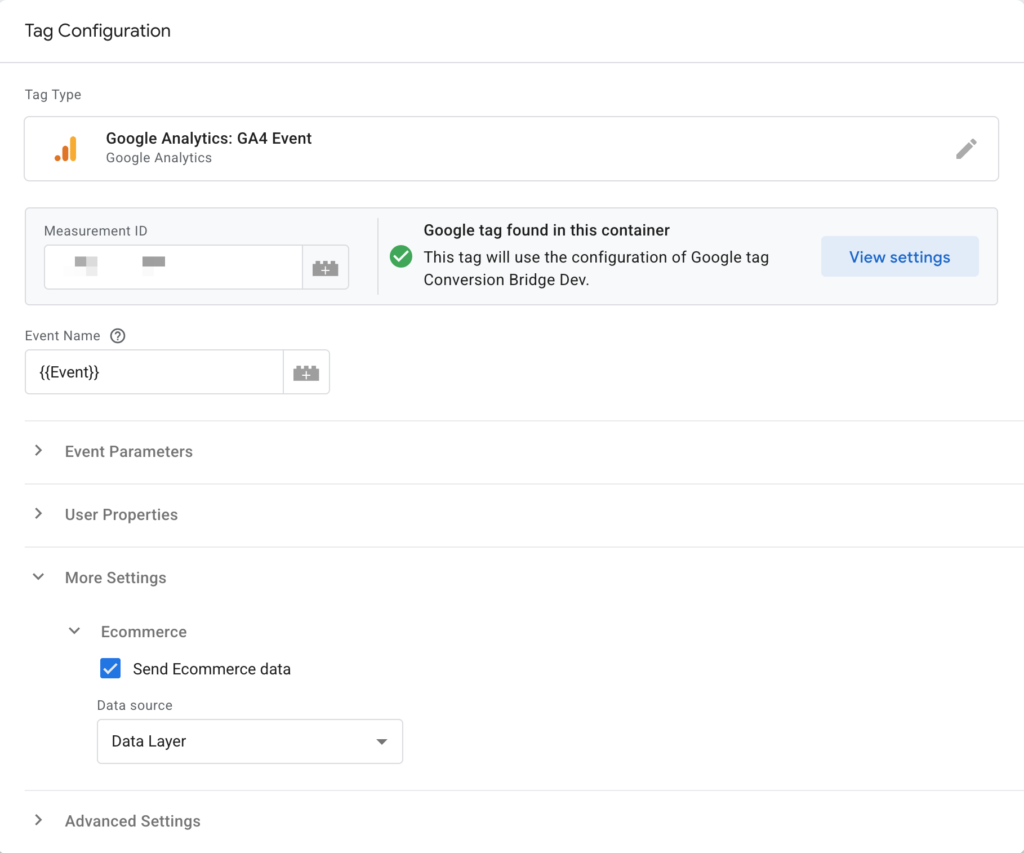
Step 3: Create Tags for GA4
Now create the tag that will fire when the event happens.
- Go to Tags > New
- Choose Tag Type: GA4 Event
- Select your GA4 Configuration Tag (must already exist)
- Set the Event Name (e.g.,
form_submit,purchase, etc.) - In Event Parameters, map values from the data layer as needed:
id→idtitle→titlevalue→value- Attach the Custom Event Trigger from Step 2
- Save the tag
For ecommerce, be sure go to to More Settings > Ecommerce > Send ecommerce data and enable this option
Repeat for Meta, Google Ads, and other platforms
The trigger in Step 2 fires once per event, but each platform needs its own tag. To also send a conversion to Meta or Google Ads, create another tag of that platform's type (for example a Meta Pixel tag or a Google Ads Conversion tag), attach the same Custom Event Trigger, and map the data layer values into the parameters that platform expects. Meta and Google Ads name their fields differently than GA4, so the mapping is different each time, and enhanced conversions require you to hash the customer data yourself.
This is the work a direct Conversion Bridge integration removes. Connect the platform in Conversion Bridge and the same event is formatted correctly for it automatically, with no extra tag to build.
Step 4: Test in GTM Preview Mode
- Click Preview in GTM
- Visit your site and trigger the event (e.g., submit a form)
- In the Tag Assistant window, look for the event name (e.g.,
form_submit) in the left panel - Click the event and confirm your tag fired correctly
Notes and Tips
- If events are firing in the console but not in GTM: make sure your trigger is listening for the exact
eventname - You can add multiple Custom Event triggers if you want to track more types of events
- Use GTM's built-in variables or create new Data Layer Variables to access values like
id(form ID),title(form title/name),value, etc.
Still need help?
If you have not yet found your answer in the documentation articles, please contact support
Contact support