WooCommerce
The WooCommerce integration tracks the full customer shopping journey from product browsing through purchase. It gives you detailed conversion data across all your connected analytics and ad platforms without writing any code.
This integration automatically tracks:
- Purchases: When a customer completes an order
- Individual product purchases: Each product in an order tracked as its own event
- View product: When a customer views a single product page
- View product variation: When a customer selects a variation on a variable product
- Add to cart: When a customer adds a product to their cart
- Remove from cart: When a customer removes a product from their cart
- View cart: When a customer views the cart page
- Begin checkout: When a customer lands on the checkout page
- Refunds: When you issue a refund for an order (sent server-side)
Setup Instructions
Step 1: Enable the Integration
- In your WordPress admin, go to Settings > Conversion Bridge > Integrations
- Find WooCommerce in the list of available integrations
- Enable the integration by checking the checkbox
Step 2: Configure Event Tracking
Each event type can be turned on or off independently. For each event you want to track:
- Track purchases -- Enable this to track completed orders. This includes the order total, currency, and all line item details.
- Track each product in order as separate event -- Enable this to fire a separate event for every product in the order. This is useful when you want per-product conversion data.
- Track each single product page view -- Enable this to track when a customer views a product page.
- Track when variant is selected on single product page view -- Enable this to track when a customer selects a specific variation (size, color, etc.) on a variable product page.
- Track item add to cart -- Enable this to track when a customer adds a product to their cart, both from shop/archive pages and single product pages.
- Track item removal from cart -- Enable this to track when a customer removes a product from their cart.
- Track cart view -- Enable this to track when a customer views the cart page. This includes the cart total and all items in the cart.
- Track begin checkout -- Enable this to track when a customer reaches the checkout page. This includes the cart total and all items.
Step 3: Enable Enhanced Conversions (Optional)
If you want to send customer data to platforms that support enhanced conversions (such as Google Ads and Meta Ads), enable the Enhanced conversions option. This sends customer email, name, phone, and address data with purchase events to improve conversion tracking accuracy.
Step 4: Save Settings
Click Save Changes to activate the integration.
How It Works
Purchase Tracking
When a customer completes an order and reaches the thank you page:
- Order received: WooCommerce fires the
woocommerce_thankyouhook on the order confirmation page - Duplicate check: Conversion Bridge checks whether this order has already been tracked to prevent double-counting
- Event data built: The integration collects the order total, currency, transaction ID, all line items with product details, and customer information
- Event fired: Conversion Bridge sends a purchase event to all your connected platforms
- Session saved: The conversion session ID is saved to the order so you can view the conversion journey later
If you also enable individual product tracking, each line item in the order fires as its own separate event right after the main purchase event.
View Product Tracking
When a customer visits a single product page, Conversion Bridge fires a view item event on page load. The event includes the product name, price, SKU, categories, and brand (if available).
View Product Variation Tracking
When a customer selects a variation on a variable product page (for example, choosing a size or color), Conversion Bridge fires a view item event with the updated variation details. This uses WooCommerce's found_variation JavaScript event to capture the selected variation's price, attributes, and variant ID.
Add to Cart Tracking
Add to cart tracking works in two ways depending on where the customer adds the product:
- Shop/archive pages: When a customer clicks an "Add to cart" button on a shop page or category page, the event fires on click. This only works for simple products (not variable products that require option selection).
- Single product pages: When a customer clicks the "Add to cart" button on a product page, the event fires on click. For variable products, the event includes the selected variation details and updated price.
Both methods capture the product name, price, quantity, SKU, categories, and brand.
Remove from Cart Tracking
Remove from cart tracking fires in two situations:
- Cart page click: When a customer clicks the remove link on the cart page, the event fires on click
- Server-side removal: When an item is removed through WooCommerce's cart update process, the event fires on page load
The event includes the removed product's name, price, quantity, and variant details if applicable.
View Cart Tracking
When a customer visits the cart page, Conversion Bridge fires a view cart event on page load. The event includes the cart total, currency, and full details of every item in the cart including variant information.
Begin Checkout Tracking
When a customer reaches the checkout page (but has not yet completed the order), Conversion Bridge fires a begin checkout event on page load. The event includes the cart total, currency, all cart items, and any applied coupon codes. This event does not fire on the order confirmation page.
Refund Tracking
When you issue a refund from the WooCommerce admin, Conversion Bridge sends a server-side refund event to platforms that support it. The refund event includes the original order's transaction ID, the refund amount, currency, and details of refunded line items. This works for both full and partial refunds.
Tracked Data
Purchase Event
The purchase event includes:
- Transaction ID: The order ID combined with a timestamp suffix
- Amount: The order total
- Currency: The order currency code
- Items: Array of all products in the order, each including:
- Product ID (uses SKU if available, otherwise the product ID)
- Product SKU
- Product name
- Unit price
- Quantity
- Product categories (up to 5 levels:
item_category,item_category2, etc.) - Product brand (if WooCommerce brands taxonomy is used)
- Variant details for variable products (variant ID, variant SKU, variant name, variant attributes)
- Coupon: Coupon code(s) if used, comma-separated
- Shipping: Shipping total if applicable
- Tax: Tax total if applicable
- User ID: The WordPress user ID for logged-in customers, or a hashed email for guests
- Customer data (if enhanced conversions enabled):
- Email address
- First name
- Last name
- Phone number
- City
- State
- Zip/postal code
- Country
Individual Product Purchase Event
Each product event includes:
- Item ID: Product SKU if available, otherwise the product ID
- Item name: Product name
- Amount: Line item subtotal
- Currency: Order currency code
- Quantity: Quantity purchased
- Unit price: Price per unit
- Categories: Product categories (up to 5 levels)
View Product Event
The view product event includes:
- Amount: Product price
- Currency: Store currency code
- Items: Single-item array with:
- Product ID (SKU if available)
- Product name
- Price
- Quantity (always 1)
- Product categories
- Product brand
Add to Cart Event
The add to cart event includes:
- Amount: Product price multiplied by quantity
- Currency: Store currency code
- Items: Single-item array with:
- Product ID (SKU if available)
- Product name
- Price
- Quantity
- Product categories
- Product brand
- Variant details (for variable products on single product pages)
Remove from Cart Event
The remove from cart event includes:
- Amount: Product price multiplied by quantity
- Currency: Store currency code
- Items: Single-item array with:
- Product ID (SKU if available)
- Product name
- Price
- Quantity
- Product categories
- Product brand
- Variant details (for variable products)
View Cart Event
The view cart event includes:
- Amount: Cart total
- Currency: Store currency code
- Items: Array of all cart items, each including:
- Product ID (SKU if available)
- Product name
- Price
- Quantity
- Product categories
- Product brand
- Variant details (for variable products)
Begin Checkout Event
The begin checkout event includes:
- Amount: Cart total
- Currency: Store currency code
- Items: Array of all cart items, each including:
- Product ID (SKU if available)
- Product name
- Price
- Quantity
- Product categories
- Product brand
- Variant details (for variable products)
- Coupon: Applied coupon code(s) if any
Refund Event
The refund event is sent server-side and includes:
- Transaction ID: The original order ID
- Value: The refund amount
- Currency: The refund currency code
- User ID: WordPress user ID or hashed email
- Items: Array of refunded line items, each including:
- Product ID
- Product SKU
- Product name
- Refunded price per unit
- Refunded quantity
- Product categories
- Product brand
- Variant details (for variable products)
Enhanced Conversions
When you enable enhanced conversions, Conversion Bridge automatically includes customer data from the WooCommerce order with purchase events. This data is sent to platforms that support enhanced conversions (such as Google Ads and Meta Ads) to improve conversion tracking accuracy and attributionThe process of determining which channels, campaigns, or actions contributed to a conversion, helping you understand what influenced a visitor’s decision to take action..
The following customer fields are sent:
- Email address -- from the billing email field
- First name -- from the billing first name field
- Last name -- from the billing last name field
- Phone number -- from the billing phone field
- City -- from the billing city field
- State -- from the billing state field
- Zip/Postal code -- from the billing postcode field
- Country -- from the billing country field
Note: Enhanced conversion data is only sent to platforms that support it and is handled according to each platform's privacy requirements. Phone and address fields allow platforms like Google Ads and Meta Ads to match conversions more accurately.
Conversion Journeys
Conversion Bridge automatically saves the session ID to each WooCommerce order. When you have conversion journeys enabled, this allows you to see the full path a customer took before placing their order -- including their landing page, the pages they visited, UTMUTM tracking tags show where traffic comes from and which campaigns lead to real conversions. parameters, and referral source.
Viewing a Conversion Journey
You can view the conversion journey for any order in two places:
- Order edit screen: A "Conversion Journey" meta box appears on the order edit page showing the full journey
- Orders list table: A "Journey" column in the orders list lets you click "View" to see the journey in a popup (see Admin Features below)
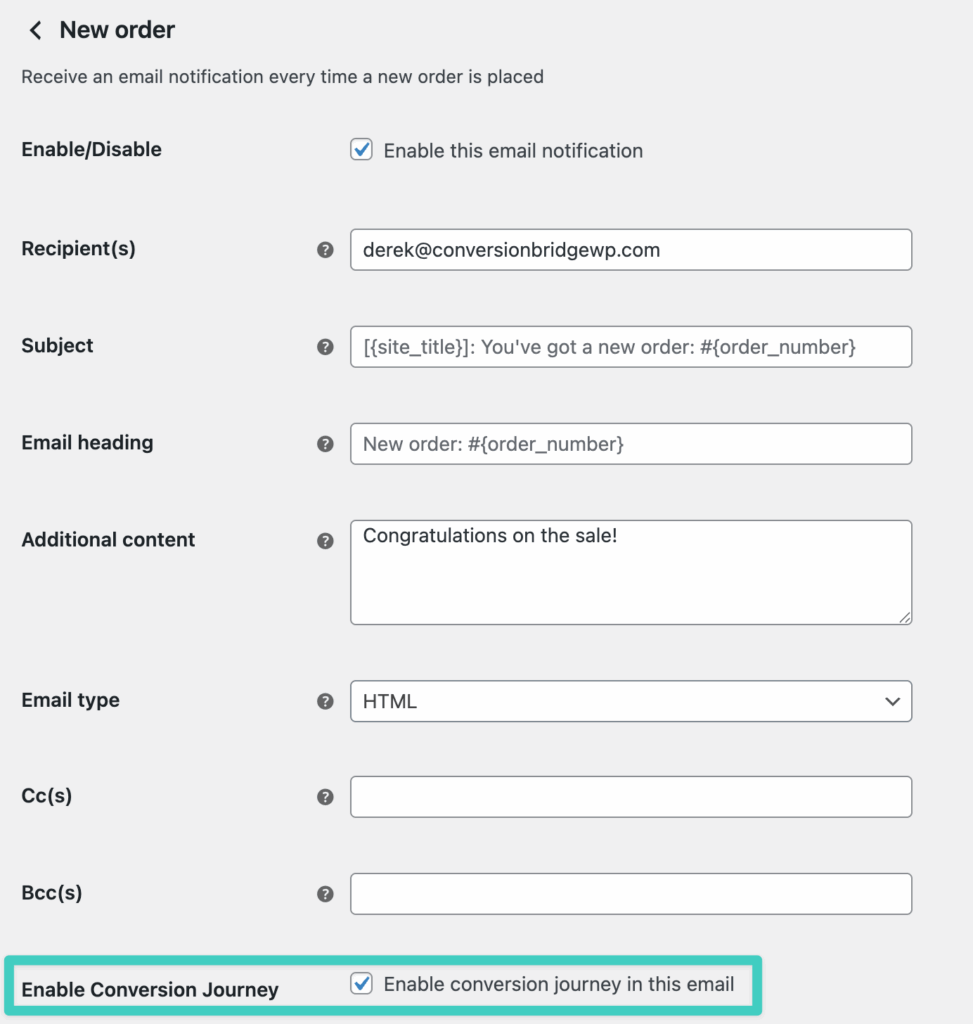
Conversion Journey in Admin Emails
You can include the conversion journey in WooCommerce's "New order" admin email. To enable this:
- Go to WooCommerce > Settings > Emails
- Click on New order
- Scroll down and check Enable Conversion Journey
- Click Save changes
When enabled, each new order email sent to the admin will include the customer's conversion journey at the bottom of the email. This lets you see how the customer found your store without leaving your inbox.
Custom Event Labels
You can customize the label for each event type to better identify events in your analytics platforms. Each event has a default label and supports a %title% placeholder that gets replaced with the product name.
| Event | Default Label | Supports %title% |
|---|---|---|
| Purchase | "Order" | No |
| Product item purchase | "Order Item: %title%" | Yes |
| View product | "View item: %title%" | Yes |
| View product variation | "View variable item: %title%" | Yes |
| Add to cart | "Add to cart: %title%" | Yes |
| Remove from cart | "Remove from cart: %title%" | Yes |
| View cart | "View cart" | No |
| Begin checkout | "Begin checkout" | No |
Admin Features
Journey and UTM Columns in Orders Table
New in version 1.13
Conversion Bridge adds two custom columns to your WooCommerce orders list table:
- Journey: Shows a "View" link for orders that have a conversion journey. Click the link to see the full journey in a popup without leaving the orders page.
- UTM: Displays the UTM parameters associated with the order's session. This lets you quickly see which campaigns and sources are driving orders.
Both columns appear after the "Status" column in the orders table. They work with both the legacy post-based order storage and WooCommerce's High-Performance Order Storage (HPOS), so you do not need to change any settings regardless of which storage method your store uses.
Variable Product Support
The integration fully supports WooCommerce variable products across all event types. When a customer interacts with a variable product, the tracked data includes:
- Item ID: The parent product's SKU or ID
- Item variant ID: The specific variation's SKU or ID
- Item variant: The selected attribute values (e.g., "Large, Blue")
- Item variant name: The parent product name combined with the variant (e.g., "T-Shirt - Large, Blue")
- Price: The variation's specific price, not the parent product's price
Product Brand Tracking
If your store uses a product brand taxonomy (the product_brand taxonomy), Conversion Bridge automatically includes the brand name with all product events. This works with plugins that register a brand taxonomy for WooCommerce products.
Still need help?
If you have not yet found your answer in the documentation articles, please contact support
Contact support