Google Analytics 4
Conversion Bridge connects your WordPress site to Google Analytics 4 (GA4) so you can track pageviews, conversions, and e-commerce activity without writing any code. Once connected, Conversion Bridge automatically sends event data from your WordPress plugins to GA4.
Connecting with OAuth (Recommended)
OAuth lets you sign in with your Google account and select your GA4 property directly from within WordPress. This is the easiest way to get started and gives you access to every GA4 feature Conversion Bridge offers.
To connect:
- In your WordPress admin, go to Settings → Conversion Bridge → Google Analytics
- Select Connect with Google (Recommended)
- Click the Connect with Google button
- Sign in to your Google account and allow the requested permissions
- Select your GA4 property from the list
- Your Measurement ID, API credentials, and custom dimensions are all set up for you automatically
Once connected, you will see your property name and Measurement ID displayed in the settings.
To disconnect: Click the Disconnect button in the Google Analytics settings at any time. This removes your Google credentials from your site but does not delete any data in Google Analytics.
Connecting Manually
If you prefer not to use OAuth, you can enter your Measurement ID by hand.
- In your WordPress admin, go to Settings → Conversion Bridge → Google Analytics
- Select Enter Measurement ID manually
- Enter your Measurement ID (see Where Do I Find My Measurement ID? below)
- Click Save Changes
Manual connections do not include the analytics dashboard, automatic custom dimension setup, or server-side event tracking. If you need those features, use the OAuth method instead.
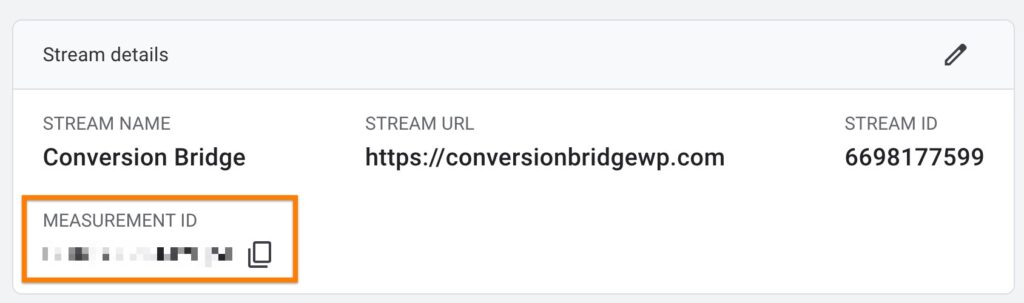
Where Do I Find My Measurement ID?
Your Measurement ID is the unique code that tells Google Analytics which property to send data to. It always starts with G- followed by a series of letters and numbers (for example, G-ABC123XYZ).
To find it:
- Log in to Google Analytics
- Click Admin (gear icon) in the bottom left
- Under Property Settings, click Data collection and modification
- Click Data Streams
- Click on your web stream (or click Add stream if none exist)
- Copy the Measurement ID shown at the top of the panel
Important: The Measurement ID is not the same as the Property ID. Make sure you copy the one that starts with G-.
Analytics Dashboard
Conversion Bridge includes a built-in Google Analytics dashboard inside your WordPress admin. This gives you a quick overview of your site's performance without needing to open Google Analytics.
Requirements: You must be connected via OAuth to use the dashboard.
To enable:
- Connect via OAuth (see above)
- Check the Enable Analytics Dashboard in Admin checkbox in the Google Analytics settings
- Save your settings
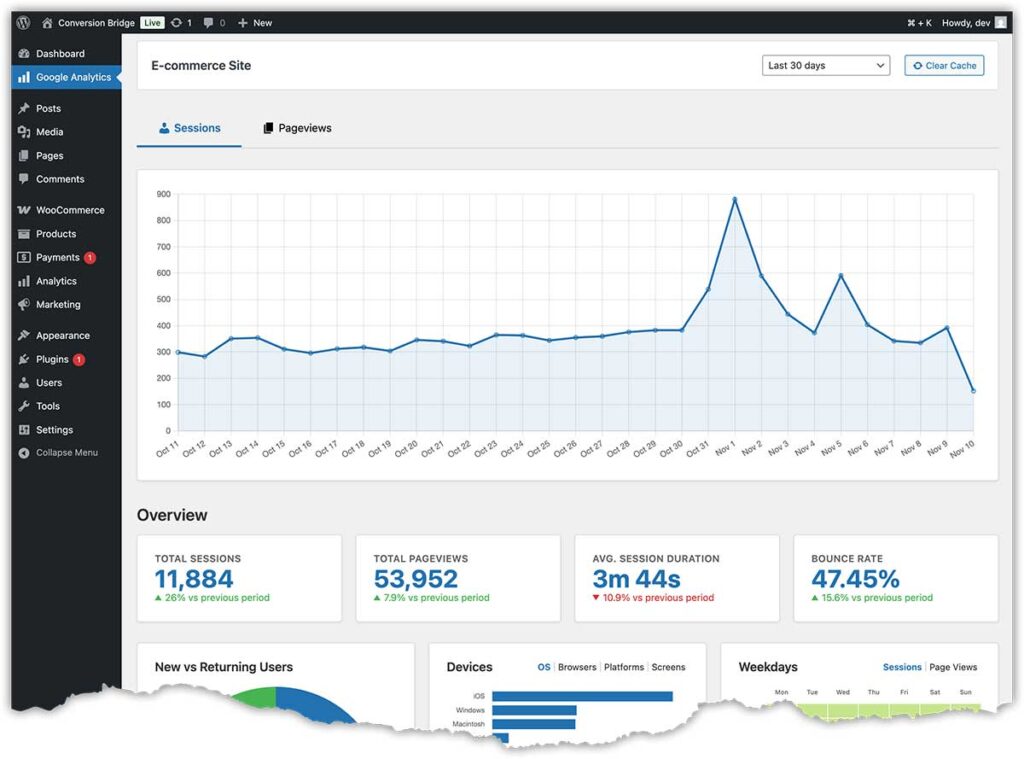
What the Dashboard Shows
- Sessions and Pageviews — How many visits and pages viewed over time
- Session Duration — Average time visitors spend on your site
- Bounce RatePercentage of visitors who leave a website after viewing only one page without interacting further. — Percentage of visitors who leave after viewing only one page
- New vs Returning Users — How many visitors are new compared to returning
- Devices — Breakdown by operating system, browser, platform, and screen size
- Weekday Heatmaps — Visual breakdown of sessions and pageviews by day and hour
- Top Pages — Most visited pages, top entry pages, and top exit pages
- Top Channels — Where your traffic comes from (search, social, direct, etc.)
- Top Referrals — Which websites are sending you the most visitors
- Location — Countries, regions, cities, and languages
- E-commerce FunnelRepresents the step-by-step process users take before completing a conversion, such as making a purchase or signing up. — Step-by-step view of how users move toward a purchase (by device, country, region, city, language, and browser)
- Top Products — Most viewed products, add-to-cart counts, quantities purchased, and revenue
Key Events
Google Analytics treats certain events as more important than others. These are called Key Events (formerly known as "conversions"). Marking an event as a key event gives it special status in your GA4 reports, including dedicated columns and extra reporting features.
Conversion Bridge automatically sends conversion events to GA4 using Google's recommended event names. This means your data works well with GA4's built-in reports right out of the box.
However, you may want to create custom key events to track specific actions, like submissions of a particular form. Since Conversion Bridge sends detailed data with every event (such as the form ID and title), you can use this data to create custom events in GA4 and mark them as key events.
For a step-by-step guide on creating and marking key events, see:
Google Analytics 4 — How to Make Key Events
Custom Dimensions
Custom dimensions let you attach extra information to your GA4 events and users. For example, you can track which post author drives the most traffic, or which content category gets the most engagement.
Requirements: You must be connected via OAuth for automatic custom dimension setup. If you're connected manually, you can still send the data — but you will need to create the dimensions yourself in GA4.
Pageview Dimensions (Event-Scoped)
These dimensions are attached to each pageview event. To enable them:
- In the Google Analytics settings, find Include extra properties
- Check the properties you want to track
- Click Save Changes
Conversion Bridge will automatically create the matching custom dimensions in your GA4 property.
Available properties:
- Author — The post or page author. Helpful for multi-author blogs and publications.
- Category — The content category. Helps you see which topics perform best.
- Tags — Post tags. Great for understanding niche interests.
- Logged In — Whether the visitor is logged in. Useful for comparing member vs. public behavior.
- Language — The site language. Important for multilingual sites.
- Post Type — The type of content (post, page, product, etc.).
- Role — The WordPress user role (admin, editor, subscriber, etc.).
User Dimensions (User-Scoped)
User dimensions track information about logged-in users across all of their sessions. These are powered by data from your WordPress plugin integrations (for example, a membership plugin can send the user's membership plan).
To enable:
- Check the Include user info checkbox in the Google Analytics settings
- Click Save Changes
As user properties are sent from your integrations, Conversion Bridge automatically creates the matching USER-scoped custom dimensions in GA4.
Common user properties include:
- is_member — Whether the user is a member
- membership — The user's membership plan
- memberships — All membership plans (comma-separated)
When Are Dimensions Created?
Conversion Bridge handles dimension creation for you automatically:
- When you first connect via OAuth
- When you enable new properties and save your settings
- During plugin updates, if any dimensions are missing
You do not need to manually create dimensions in Google Analytics.
Note: If you see a permission error, you may need to reconnect your OAuth connection. Dimension creation requires the analytics.edit permission from Google. Your tracking data will still be sent even if dimension creation fails — you would just need to create the dimensions manually in GA4 to see the data in reports.
User ID Tracking
User ID tracking lets Google Analytics recognize the same logged-in user across different devices and sessions. This is useful for sites with returning logged-in visitors, such as e-commerce stores, membership sites, or learning platforms.
To enable:
- Check the Send user ID of current logged in user checkbox
- Click Save Changes
User ID is only sent for logged-in users. Anonymous visitors are not affected.
User Info
Some WordPress plugins integrated with Conversion Bridge can send extra user attributes to GA4 for the currently logged-in visitor. For example, a membership plugin might include which membership plan the user is on.
This data is sent as GA4 user properties and, when connected via OAuth, corresponding custom dimensions are automatically created (see User Dimensions above).
To enable:
- Check the Include user info checkbox
- Click Save Changes
Learn more in the User Info documentation.
E-Commerce Product Variation Tracking
If your store sells products with variations (like size or color), you can control how those variations appear in Google Analytics.
To customize:
- Check the Customize ecommerce tracking checkbox
- Choose your preferred options (see below)
- Click Save Changes
Variation ID Tracking
- Use variation product ID/SKU (Recommended) — Each variation is tracked with its own unique ID or SKU. Best for seeing how specific variations perform. (Example:
SHIRT-SM-RED) - Use parent product ID/SKU — All variations use the parent product's ID. Best if you only care about overall product performance.
Variation Name Tracking
- Use parent product name only (Recommended) — All variations appear under the same product name. Keeps reports clean and simple. (Example: "Cool Shirt")
- Use parent product + variation attributes — Adds the variation details to the name. Useful if you want to see the full variation in reports. (Example: "Cool Shirt – Small, Red")
Conversion Bridge always sends the item_variant parameter regardless of which options you choose, so detailed variation data is always available in GA4.
Consent Mode
Conversion Bridge supports Google Consent Mode v2. This tells GA4 whether a visitor has allowed or denied analytics and marketing cookiesA small piece of data stored in a user’s browser that helps websites remember user activity, preferences, or sessions across visits..
How it works:
- Consent Mode turns on automatically when you select a cookie banner plugin in Settings → Conversion Bridge → Cookie Consent. There is no separate checkbox.
- When the page loads, Conversion Bridge sets the default consent state to denied, then listens for the visitor's choice and updates Google Consent Mode in real time.
- If no cookie banner plugin is selected, Conversion Bridge does not send any consent signals. Google treats consent as granted in that case.
Important: Only send consent signals from one place. The Consent Signal Ownership setting controls whether Conversion Bridge or your cookie banner sends Google's consent signals for each platform. See the Consent Signal Ownership guide.
June 2026 change: Google Signals (the GA4 property setting for cross-device data) no longer controls whether advertising data flows from GA4 to a linked Google Ads account. Since June 15, 2026, the Consent Mode ad_storage signal is the only control. Conversion Bridge manages ad_storage for you based on the visitor's actual consent choice, so a correctly connected cookie banner keeps you covered.
You can verify your setup with Google's Tag Assistant debugger.
Excluding the Script Tag
By default, Conversion Bridge adds the GA4 tracking script to your site for basic pageview tracking. If another plugin (like Google Site Kit) is already adding the GA4 script, you should exclude it from Conversion Bridge to prevent double-counting pageviews.
To exclude:
- Check the Exclude script tag option
- Click Save Changes
Conversion Bridge will still send conversion events — it just won't add the base GA4 tracking script.
Note: Make sure your other plugin is properly set up to handle pageview tracking.
Measurement Protocol (Server-Side Events)
Measurement Protocol allows Conversion Bridge to send events directly from your server to GA4. This is used for actions that happen on the server, such as refunds processed through your e-commerce plugin.
Requirements:
- OAuth connection (recommended) — Credentials are configured automatically
- Manual setup — You need to provide both your Measurement ID and a Measurement Protocol API Secret
To set up manually:
- Enter your Measurement ID (see Where Do I Find My Measurement ID?)
- Create a Measurement Protocol API Secret in Google Analytics:
- Go to Admin → Data Streams → your stream → Measurement Protocol API secrets
- Click Create
- Copy the secret value
- Paste the secret into the Conversion Bridge settings
Once configured, Conversion Bridge will automatically use Measurement Protocol for server-side events like refunds.
Debug Mode
Debug mode helps you verify that Conversion Bridge is sending data correctly to GA4. When enabled, events are sent to GA4's DebugView, where you can inspect them in real time.
To enable:
- Check the Debug mode checkbox
- Optionally, choose which WordPress user roles should see debug mode (defaults to all users)
- Click Save Changes
Debug events will appear in GA4 under Admin → DebugView.
You can also use the Debugger for Google Analytics 4 Chrome extension to see events as they are sent from your browser.
Remember: Turn off debug mode once you're done testing.
Still need help?
If you have not yet found your answer in the documentation articles, please contact support
Contact support