
Custom Tracking Scripts let you paste any vendor's tracking snippet directly into Conversion Bridge and have it loaded with the same consent-banner gating as the built-in platform integrations. If a tracking tool you use isn't already an official integration, this is how you add it without touching theme code or installing another plugin.
Overview
Many tracking tools don't have dedicated WordPress plugins. Their setup instructions are usually a paragraph of HTML asking you to paste <script> tags into the head or footer of every page on your site. Custom Tracking Scripts gives you a clean place to do that, with full control over where the script loads, which pages it runs on, and whether it should be gated by visitor consent.
Each script you add is rendered on the front-end with the same consent attributes Conversion Bridge uses for its built-in platform integrations. If a visitor hasn't granted the required consent, the connected cookie banner blocks the script. When consent is granted, the script activates automatically.
Setup Instructions
- In your WordPress admin, go to Settings > Conversion Bridge > Custom.
- Click the Scripts sub-tab.
- Click + Add custom script.
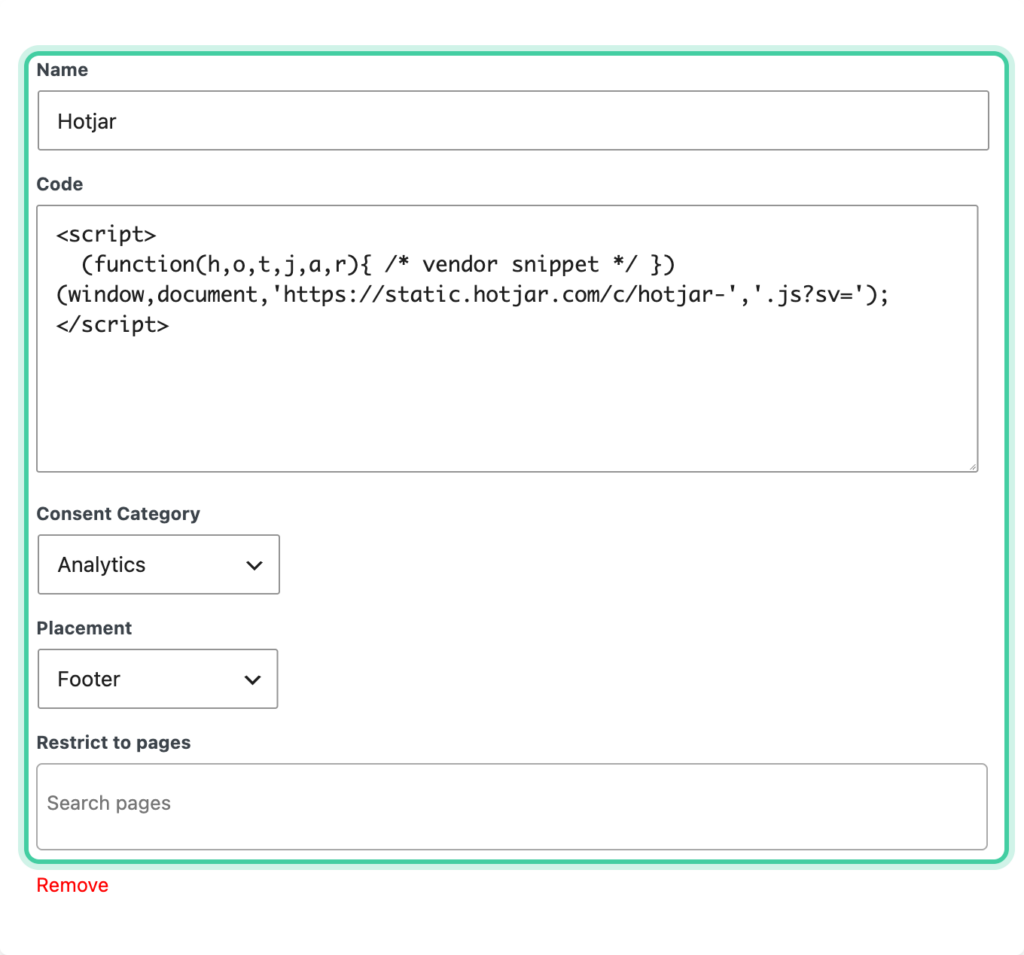
- Fill in the fields:
- Name -- A label for your own reference (e.g., "Hotjar", "Crazy Egg", "ProductHunt pixel"). This is just for your settings page.
- Code -- Paste the vendor snippet here, including the
<script>tags. Multiple<script>tags in a single snippet are supported. - Consent Category -- Choose Analytics, Marketing, or None (always load). See Consent Categories below.
- Placement -- Pick Head, After
<body>open, or Footer. Most vendor snippets work in the Footer, but follow the vendor's instructions if they specify a placement. - Restrict to pages -- Optional. Leave empty to load on the entire site, or search and select specific pages to limit where the script runs.
- Add as many scripts as you need. Scripts run in the order they appear in the list.
- Click Save Changes.
Only WordPress users with the unfiltered_html capability (administrators on single-site installs, super admins on multisite) can save script code. Users without that capability will see a notice and the code field will be disabled.
How It Works
Each script is rendered in the placement you selected on every page that passes its page restriction. If the script has a consent category set, every <script> tag in the snippet is tagged with consent attributes so your active cookie banner can block or release it based on the visitor's choices.
For analytics and marketing scripts, the standard flow is:
- The script tags are output with the consent attributes the active cookie banner expects (Cookiebot, CookieYes, Complianz, WPConsent, and others all use slightly different attributes).
- If the visitor has already given the required consent, the script runs immediately.
- If the visitor hasn't given consent, the banner blocks the script from running. As soon as the visitor accepts the matching consent category, the script activates without a page reload.
Scripts set to None (always load) skip consent gating entirely and run on every matching page. Use this only for scripts that genuinely don't require consent (rare for analytics or marketing tools).
Consent Categories
There are three consent category options:
- Analytics -- For scripts that collect visitor analytics (page views, session data, heatmaps, session replay). The script runs only after the visitor accepts analytics/statistics consent.
- Marketing -- For scripts that power advertising, retargeting, or attributionThe process of determining which channels, campaigns, or actions contributed to a conversion, helping you understand what influenced a visitor’s decision to take action. (custom ad pixels, affiliate trackers). The script runs only after the visitor accepts marketing consent.
- None (always load) -- The script always loads, with no consent check. Use this only when you're certain the script doesn't require consent.
If you're unsure which category to pick, check the vendor's documentation or assume Marketing for any pixel-style snippet and Analytics for any reporting or measurement snippet.
Per-Script Consent Ownership
When a cookie banner is connected, Conversion Bridge gives each custom script the same per-platform consent ownership control as the built-in platforms. You can decide whether Conversion Bridge or the cookie banner should be the source of truth for that script's consent signals.
To configure ownership for a custom script:
- Save the script first so it appears in your active scripts list.
- Go to Settings → Conversion Bridge → Options and find the Cookie Consent section.
- Scroll to the consent signal ownership section. Each saved custom script appears alongside the built-in platforms.
- Set the ownership to Conversion Bridge (recommended) or Consent Banner depending on which system should manage that script's consent signals.
Learn more in the Consent Signal Ownership guide.
Placement Options
Pick the placement that matches the vendor's instructions:
- Head -- Runs early in page load, inside the
<head>. Use this for scripts that need to run before content renders (rare for analytics, common for performance tools). - After
<body>open -- Runs immediately after the opening<body>tag. Used by some analytics tools (GTM is the most common example). - Footer -- Runs at the bottom of the page just before
</body>. The safe default for most analytics and pixel snippets.
When in doubt, Footer is the right choice -- it loads after the rest of the page, so it doesn't slow down rendering, and almost every vendor snippet supports it.
Page Restrictions
By default, every custom script runs on every page of your site. If you only want a script to run on specific pages (for example, a "thank you" page pixel that should only fire once after a conversion), use the Restrict to pages field to select the pages where it should load.
Leave the field empty to load on the entire site.