Meta Ads
Enable Meta Ads
In your WordPress admin, go to Settings > Conversion Bridge > Platforms. Enable the toggle for Meta Ads.
Getting Your Meta Pixel ID
Follow the steps provided by Meta to create a new Pixel. Once done, you only need to provide the Pixel or Dataset ID that was created.
To find the ID, go to the Data Sources tab within the Events Manager of Meta Business. Then click on the name of the data source you want to use. You can find the ID listed in multiple locations throughout the page as highlighted in the screenshot below that you can copy and paste into the Conversion Bridge settings.
Getting Access Token for API based tracking
By default Conversion Bridge always uses JavaScript based tracking for all platforms, including Meta. However, you can optionally enable API based tracking which allows for more accurate tracking as it can get around browser-based ad blockers.
To get started, you need to get an Access Token from Meta.
- Go to the Meta Events Manager
- Be sure to select the proper account
- Click on "Data Sources"
- Select your preferred Data Source/Pixel setup
- Click on "Settings"
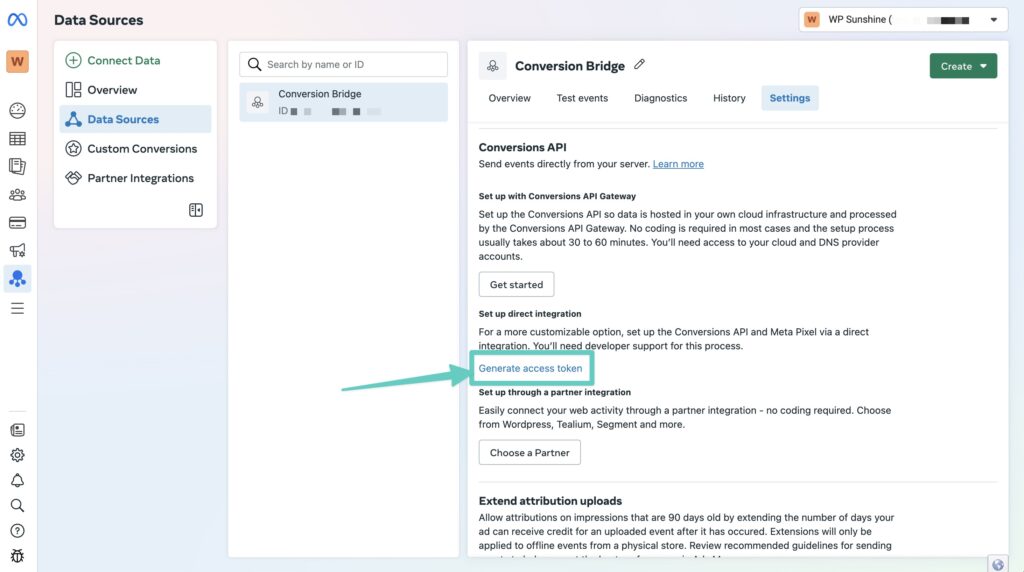
- Scroll to Conversions API and click "Generate access token"
- Copy and paste this into your Conversion Bridge settings
When creating your Meta Conversions API access token, choose “Create without Dataset Quality API.” Meta labels the other option as recommended, but Conversion Bridge doesn’t use the Dataset Quality API, so selecting the simpler option is the correct setup.
Configuring Multiple Meta Pixels
Conversion Bridge supports adding multiple Meta pixels to your website, allowing you to track conversions to different Meta advertising accounts simultaneously.
Why Use Multiple Pixels?
Agency Partnerships: When an agency takes over marketing for a client, they can add their own Meta pixel alongside the client's existing pixel. Both parties can track conversions independently in their respective Meta Business accounts while maintaining separate reporting and optimization capabilities.
Multi-Brand Management: If you manage multiple brands or business units under one website, each can maintain their own Meta pixel for separate campaign tracking and attributionThe process of determining which channels, campaigns, or actions contributed to a conversion, helping you understand what influenced a visitor’s decision to take action..
Testing & Migration: During pixel migrations or A/B testingA method of comparing two versions of a webpage, email, or element to see which one performs better based on user behavior or conversion rates., you can run multiple pixels simultaneously to compare data accuracy and ensure a smooth transition without losing tracking data.
How It Works
In the Meta Ads settings, use the Pixels repeater field to add multiple pixel configurations. Each pixel entry includes:
- Pixel/Dataset ID (see above): The unique identifier for your Meta pixel
- Access Token (optional, see above): Required only if you want to use the Meta Conversions API for server-side tracking
- Test Event Code (optional): A temporary code from Meta Events Manager used to send server-side Conversions API events to Meta's Test Events view
When multiple pixels are configured, all pixels are initialized on page load and every conversion event is automatically sent to all configured pixels. Each pixel can have its own access token for Conversions API tracking, allowing for server-side event tracking to specific pixels.
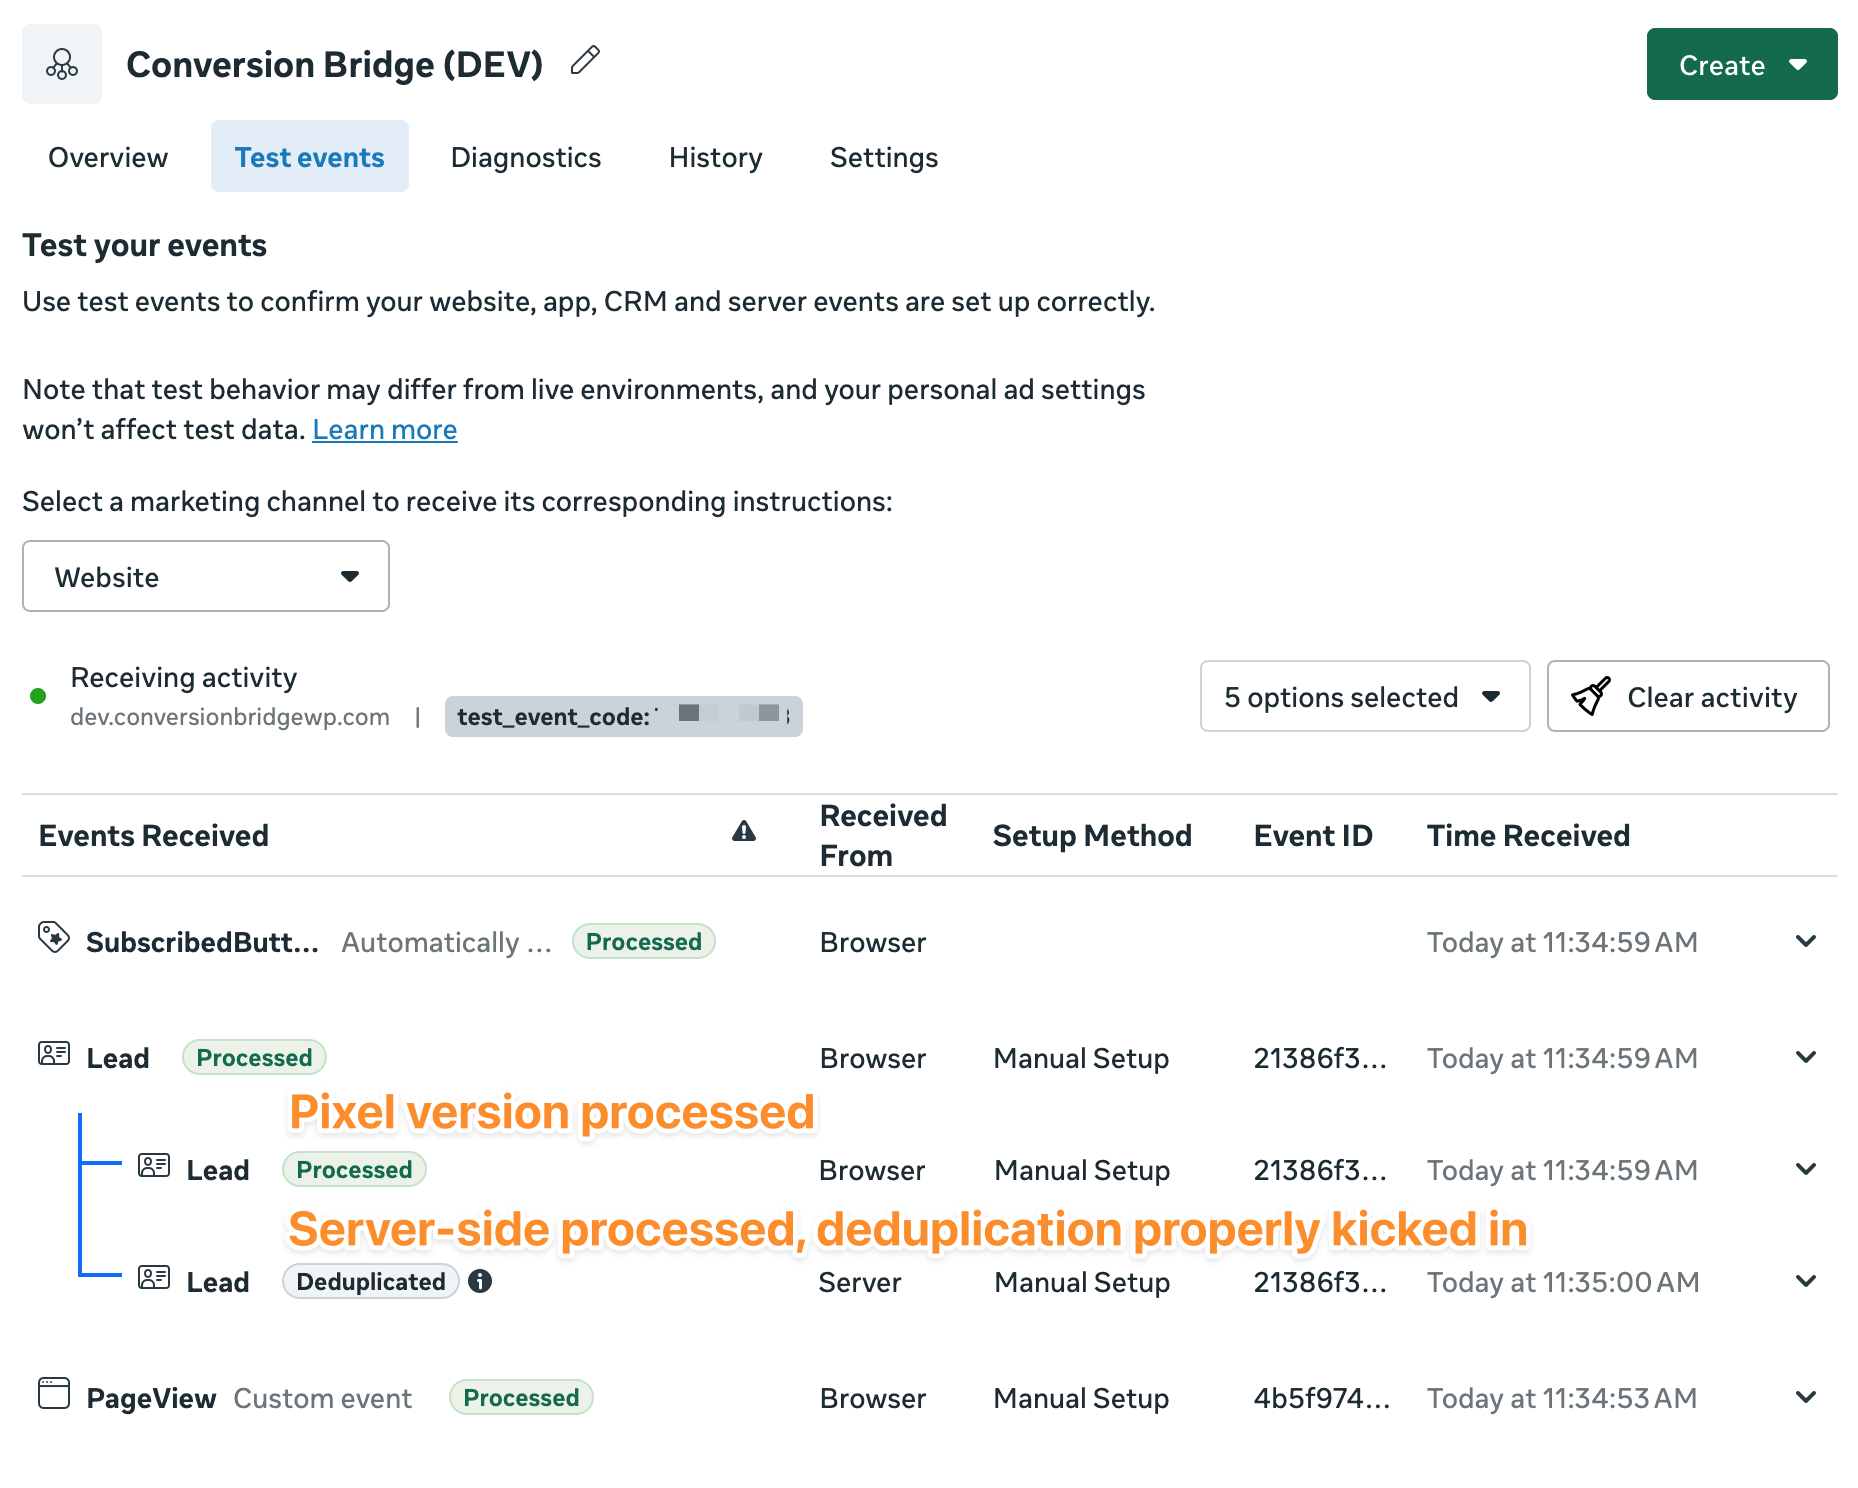
Testing Server Events in Meta
Meta Events Manager can provide a temporary Test Event Code so you can confirm Conversions API events are arriving in Meta's Test Events screen.
- In Meta Events Manager, open your Pixel/Dataset.
- Go to the Test Events tab and copy the server event test code Meta provides.
- In WordPress, go to Settings > Conversion Bridge > Ads > Meta Ads.
- Open the Pixel/Dataset row you are testing and paste the code into Test Event Code.
- Save, trigger the conversion on your site, and confirm the event appears in Meta's Test Events view.
- Remove the Test Event Code from Conversion Bridge after testing.
The Test Event Code only applies to server-side Conversions API events, so the same pixel row must also have an Access Token. If you have multiple Pixel/Dataset rows, add the code only to the row for the Meta data source you are testing.
Track Page Views
The Track all Page Views option gives you control over whether to track every pageview via the Meta Conversions API, or only track important conversion events (purchases, form submissions, etc.) via the API.
Default Behavior
By default, this option is disabled:
- Pageviews are tracked only via the browser-based Meta Pixel
- Conversion events are automatically sent via the Conversions API when an access token is configured
- This minimizes API calls while ensuring critical conversion events are tracked server-side
When to Enable
Enable Track all Page Views if you want to track every page view via the Meta Conversions API. This provides complete server-side tracking for all pageviews and better accuracy when browser-based tracking is blocked.
Requirements
- At least one access token must be configured for your Meta pixel(s)
Conversion events are always sent via the Conversions API when an access token is configured, regardless of this setting. This option only controls whether page views are also sent via the API.
Enhanced Conversions / Advanced Matching
Meta allows for Enhanced Conversions (or as Meta calls it Advanced Matching). This allows your website to send first-party dataInformation collected directly from your website visitors, customers, or users—such as form submissions, purchase history, and behavior on your site. securely along with your conversion data to better associate a user click with a conversion.
Most plugin conversion tracking integrations will automatically send enhanced conversion tracking data without any additional configuration. However, learn how to configure Enhanced Conversions for form integrations.
Enhanced Conversions requires the use of Meta API based tracking and an access token.
Enhanced matching data directly impacts your Event Match QualityWhat it means: Event Match Quality is a score that Meta (Facebook) gives to each type of conversion event you send from your website. It measures how well the data you send -- things like email addres... score in Meta Events Manager. A higher score means Meta can match more conversions to real users, improving ad optimization and lowering costs. Learn how to check your Event Match Quality score.
Targeting Specific Conversion Events
Conversion Bridge sends event parameters along with each conversion event to Meta. You can use these parameters to create Custom Conversions in Meta that target specific events—such as a particular form, product category, or membership level—rather than optimizing for all events of a given type.
Event Parameters
Conversion events include parameters that provide context about the conversion. Common parameters include:
- id: A unique identifier (e.g., form ID, product ID)
- title: The name of the item (e.g., form name, product name)
- label: A custom label you can configure in Conversion Bridge settings
- value: The monetary value of the conversion
- currency: The currency code for the value
The specific parameters available depend on the event type and integration. For example, form submissions include the form's ID, title, and any custom label you've set.
Product Line Item Data
Purchase events from ecommerce integrations (WooCommerce, Easy Digital Downloads, etc.) also include a contents array with individual product line items. Each item in the array contains:
- id: The product ID (or variant ID if applicable)
- quantity: The number of units purchased
- item_price: The price per unit
This data allows you to create Custom Conversions that target purchases containing specific products. For example, you can create a conversion that only fires when a particular product ID is in the order, letting you optimize ad campaigns for specific products rather than all purchases.
Creating a Custom Conversion in Meta
Custom Conversions allow you to filter events by their parameters. This is useful when you want to optimize ad campaigns for a subset of conversions.
- Go to Meta Events Manager
- Click "Custom Conversions" in the left sidebar
- Click "Create Custom Conversion"
- Configure the custom conversion:
- Name: A descriptive name for this conversion
- Data Source: Select your pixel
- Event: Choose the event type (e.g., Lead, Purchase)
- Rules: Add rules to filter by event parameters
- Click "Create"
Once created, you can select this Custom Conversion as the optimization goal in your ad campaigns.
Example: Targeting a Specific Form
Suppose you have three forms on your website:
- Newsletter Signup (ID: 123)
- Contact Form (ID: 456)
- Free Consultation Request (ID: 789)
All three send Lead events to Meta, but you want to optimize your ad campaign specifically for "Free Consultation Request" submissions.
Step 1: Identify the parameter to filter by
Form submissions include these parameters by default with every form submission as custom event parameters:
- id: The form's unique ID
- title: The form's name
- label: A custom label set in Conversion Bridge
Using the label is often the most flexible option since you control it directly and it won't change if you recreate the form.
Step 2: Create a Custom Conversion
In Meta Events Manager, create a Custom Conversion with these settings:
- Event: Lead
- Rule: Parameter
labelequalsconsultation-lead(or useidequals789)
Step 3: Use in your ad campaign
When setting up your campaign, select your Custom Conversion as the optimization event. Meta will optimize delivery for users likely to complete that specific form.
Example: Targeting Purchases of a Specific Product
Suppose you sell several products and want to optimize a campaign specifically for purchases that include your flagship product (ID: 42).
Step 1: Identify the parameter to filter by
Purchase events include a contents array with each product's id. Meta's Custom Conversion rules can match against values within this array.
Step 2: Create a Custom Conversion
In Meta Events Manager, create a Custom Conversion with these settings:
- Event: Purchase
- Rule: Parameter
contentscontains42(the product ID)
This Custom Conversion will only count purchases where product ID 42 was in the order, regardless of what other products were also purchased.
Step 3: Use in your ad campaign
Select this Custom Conversion as your optimization event. Meta will optimize delivery for users likely to purchase that specific product.
Tips
- Use descriptive labels: Configure meaningful labels in Conversion Bridge (e.g.,
demo-request,pricing-inquiry) to make filtering easier - Create separate Custom Conversions: For each high-value conversion action, create its own Custom Conversion for independent optimization and reporting
- Combine rules: Use multiple conditions (AND/OR) in Meta's Custom Conversion rules for more complex filtering
How to Confirm Events Are Being Tracked
If you are using the Meta Pixel for tracking events, you can install the Meta Pixel Helper Chrome extension. This will tell you when events are tracked by performing the conversion event yourself and check the results from this extension.
Example WooCommerce purchase event tracked in Meta
If you are using the Access Token for API based tracking, there are two ways to confirm conversion events are being tracked:
Using Conversion Bridge logging
Enable Conversion Bridge logging and then check the log file to see if Meta ad events are being successfully logged. It will appear similar to this in the log file if it is a success:

Example Meta Conversion API result in log file
Using Meta Events Manager
Alternatively, you can fully confirm the event in the Meta Events Manager and looking at the latest events associated with the Pixel ID that you have for the site.
Events can take up to 30 minutes to appear in this dashboard, so please be patient after running a test
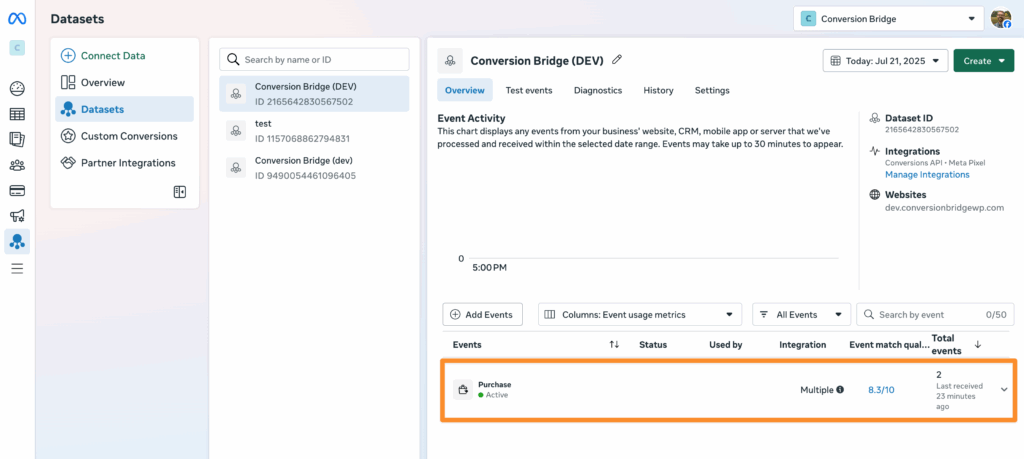
Screenshot of Meta Events Manager showing confirmed tracked events
Still need help?
If you have not yet found your answer in the documentation articles, please contact support
Contact support