Custom Events
In addition to all the plugin integrations Conversion Bridge has available for one-click conversion tracking, you can also track any custom events that users may take on your site. Custom events allow you to track unique interactions that aren't covered by standard plugin integrations.
You can configure a conversion for any of the following event types:
- Click - Track when users click on any element
- File Download - Track when users click on a file download link using a CSS selector
- Scroll - Track when users scroll to any element
- JavaScript Event - Track any JavaScript event on any element (including document)
- Time on Page - Track when a visitor stays on a page for a specific duration
- Page View - Track a custom conversion when a visitor views a specific page
Finding Your CSS Selector
The first step for creating most custom events will be to set the CSS selector to associate the event with. If you are wanting to track when a specific button is clicked, we need to set the unique CSS selector for that element.
In Google Chrome
- Open Developer Tools: Right-click on the part of the webpage you're interested in, and select "Inspect." This opens the Developer Tools.
- Highlight the Element: In the Elements tab, you'll see the HTML code for the page. Hover over the parts of the code to see them highlighted on the webpage.
- Find the CSS Selector: Once you find the HTML element you're interested in, right-click on it in the Elements tab. Go to "Copy" and then select "Copy selector." This copies the CSS selector to your clipboard.
In Safari
- Enable Developer Menu: First, make sure the Developer menu is enabled. Go to Safari > Preferences > Advanced and check "Show Develop menu in menu bar."
- Open Web Inspector: Right-click on the part of the webpage you want to inspect, and select "Inspect Element." This opens the Web Inspector.
- Select the Element: In the Elements panel, you'll see the page's HTML. Hover over the HTML code to find the element you need.
- Copy the CSS Selector: Right-click on the HTML element in the Elements panel, go to "Copy" > "Copy Selector" to get the CSS selector.
Example CSS Selectors
You want to use a full CSS selector like you would in an actual CSS file. For example:
.compare-pricing a- Targets links inside elements with the class "compare-pricing"#logo a- Targets links inside the element with ID "logo"a[data-attribute="custom"]- Targets links with a specific data attribute
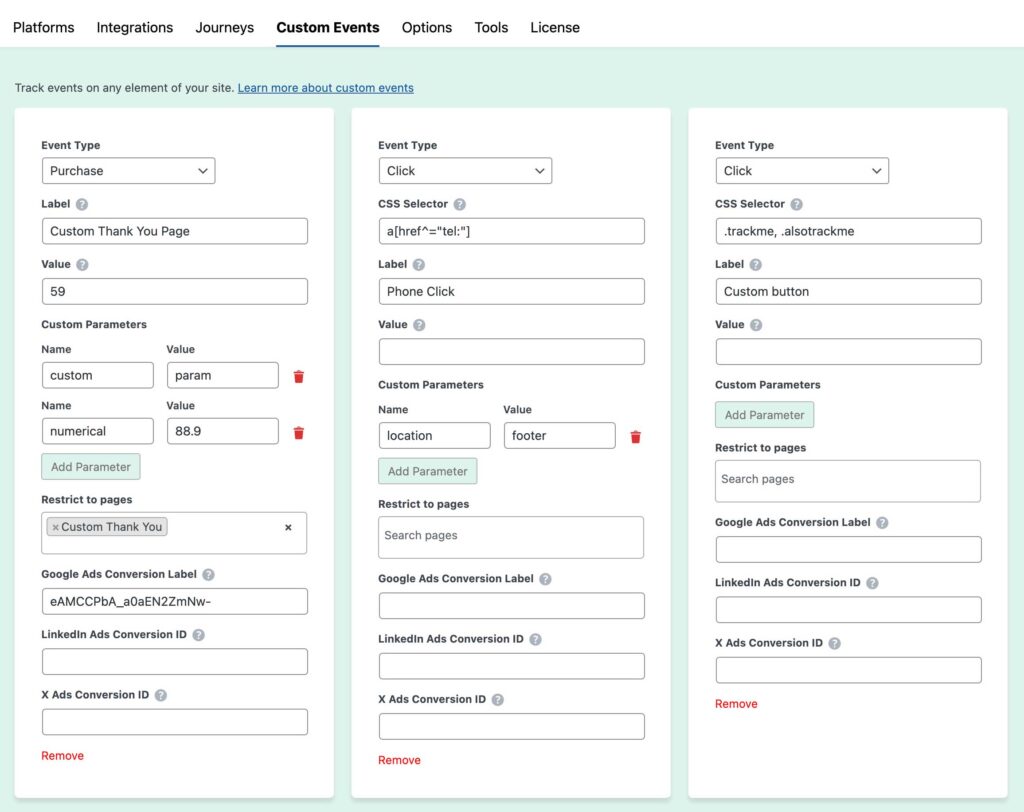
Creating Your Custom Event
Now that you have your CSS selector, you need to set the other options for the event:
Required Fields
- Label (required) - What appears in your analytics platform as the event name
- Type (required) - The type of event (click, scroll, event, time, or page)
Optional Fields
- Value (optional) - Passed to your analytics platform (if supported). Can be a number or include currency (e.g., "10 USD" or "25.50 EUR")
- Page - Which page (or pages) do you want to look for this event to happen. You can select:
- A single page
- Multiple pages (select multiple from any public post type)
- Leave empty to track on all pages
- Selector - The CSS selector for the element to track (required for click, scroll, and JavaScript event types)
- Event - The JavaScript event name (required for JavaScript event type, e.g., "load", "submit", "change")
- Time - Duration in seconds (required for time-based events)
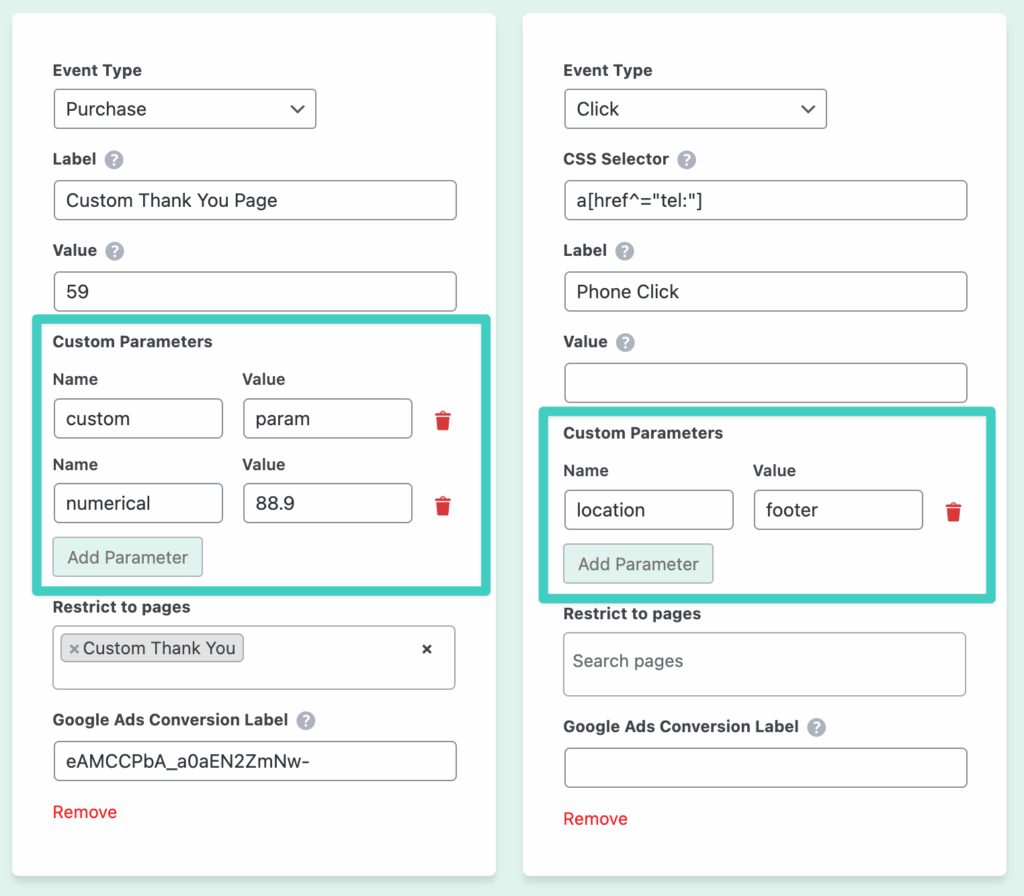
Custom Parameters
You can add custom parameters to each event that will be passed to your analytics platforms. These parameters allow you to send additional data with your events.
Parameter values can be either static text or dynamic values pulled from the clicked element's attributes using the attr:* syntax.
Static values: Enter any text or number directly (e.g., electronics, premium, 49.99)
Dynamic values with attr:*: For click and file download events, you can pull attribute values from the clicked element at the time of the click. Use the format attr: followed by the attribute name:
attr:href— Captures the link URL from the clicked elementattr:data-file— Captures a customdata-fileattributeattr:data-category— Captures a customdata-categoryattribute- Any valid HTML attribute name works with this syntax
Example Use Cases:
- Track which file was downloaded: parameter key
file_url, valueattr:href - Capture a product ID from a data attribute: parameter key
product_id, valueattr:data-product-id - Send a static category with a click event: parameter key
category, valueelectronics - Include custom metadata about the user's interaction
Custom parameters are merged into the event data and sent to all enabled platforms that support custom event parameters.
Event Types
Click Events
Track when users click on any element using a CSS selector.
- Set Type to "Click"
- Enter the CSS Selector for the element (e.g.,
.cta-button,#signup-link) - Set a Label for the event
- Optionally set a Value and select which Page(s) to track on
Example: Track clicks on a "Request Demo" button with selector .request-demo-btn
Scroll Events
Track when users scroll to a specific element on the page. The event fires when the element becomes visible in the viewport.
- Set Type to "Scroll"
- Enter the CSS Selector for the element to scroll to
- Set a Label for the event
- Optionally set a Value and select which Page(s) to track on
Example: Track when users scroll to a pricing section with selector #pricing-section
JavaScript Events
Track any JavaScript event that occurs on an element or the document. This is useful for tracking form submissions, video plays, or any custom JavaScript events.
- Set Type to "Event"
- Enter the CSS Selector for the element (or use "document" for document-level events)
- Enter the Event name (e.g., "submit", "play", "load", "change")
- Set a Label for the event
- Optionally set a Value and select which Page(s) to track on
Example: Track form submissions with selector form#contact-form and event submit
If you are working with a JavaScript event that is attached to the "document", you can use "document" as the selector.
Time on Page Events
The "Time on Page" event type allows you to send a custom event whenever a visitor is on a single page more than the set time. This event type does not need a CSS selector.
- Set Type to "Time"
- Enter the Time in seconds (e.g., 30 for 30 seconds)
- Set a Label for the event
- Optionally set a Value and select which Page(s) to track on
Example: Track when users spend more than 60 seconds on a pricing page
Page View Events
Yes, by default Conversion Bridge is tracking every page view already. However, this event type is for when you need to define a conversion when a visitor views a specific page, not just a standard page view.
- Set Type to "Page"
- Select the Page(s) where you want to track the conversion
- Set a Label for the event
- Optionally set a Value
Example: Track a conversion when users view a thank you page after completing a form
Value and Currency
When setting a value for your custom event, you can:
- Numeric Value: Enter just a number (e.g.,
10or25.50) - Value with Currency: Enter a number followed by a space and currency code (e.g.,
10 USDor25.50 EUR)
The currency will be automatically detected and passed to platforms that support currency-specific values.
Multiple Pages
You can configure a custom event to track on multiple pages by selecting multiple pages from any public post type. This is useful when you want to track the same interaction across different pages (e.g., clicking a "Learn More" button that appears on multiple product pages).
Platform-Specific Parameters
Some ad platforms require platform-specific conversion tracking parameters that can be configured per event. These settings allow you to specify which conversion action to track in each ad platform.
Platforms that require conversion labels/IDs:
- Google Ads: Set a Conversion Label for each custom event to specify which conversion action to record
- LinkedIn Ads: Set a Conversion ID for each custom event
- X (Twitter) Ads: Set a Conversion ID for each custom event
Example: For Google Ads, you can set a Conversion Label for each custom event. This tells Google Ads which specific conversion action to record when the event fires, allowing you to track different custom events to different conversion actions in your Google Ads account.
These platform-specific parameters are separate from the general custom parameters and are used specifically for ad platform conversion tracking setup.
Still need help?
If you have not yet found your answer in the documentation articles, please contact support
Contact support